February 2019: Parallel, more adventures with vertical storage and woven shibori in Tasmania

February 28, 2019

All is organised for the exhibition next month. Here’s the invitation. Next month of course there’ll be more on the exhibition. It will be well under way by then.

RAG Invites March 2019 Parallel HR

Now to continue on from last month’s blog.  I had started to explore the possibility of weaving with a vertical storage positioned between the beater and the shafts. Previously I had worked with it behind the heddles at the back of the loom. Having it positioned at the rear of the loom allows for free movement of the shafts. Having the storage in front of the loom means that if anything is selected on the pattern shafts, it has to either work with the heddles or it has to be disengaged every time the basic fabric structure is woven.

In the previous month, I explored the use of the stored pattern being used in addition to plain weave to create vertical floats for Bronson Lace. This is an ideal application. What else could I do? As an extra challenge, all the patterns to be woven had to have elements of the same pattern developed for the Bronson Lace.

I have already shown this image of 3 approaches last month. The previous month recorded the process of weaving Bronson Lace. As you’ll see there was more woven on this warp.

DSC06391

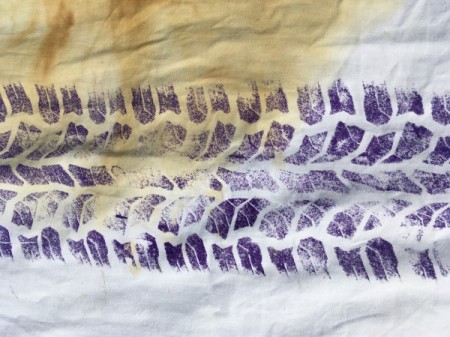
It is extremely logical to achieve weft floats for woven shibori. It was also timely weaving some woven shibori as it has been the focus over my studio work leading up to next month’s exhibition. The resist floats can easily be stored in the vertical storage. It is common and especially so in this pattern, that every resist row is different. This suits storing it and allows for a progression of sequences with plain weave being woven on the shafts between.

This undyed woven shibori design shows direct correlation to the Bronson Lace table mat.

DSC06398

I decided to explore other possibilities.

The next challenge was to weave the design as a supplementary weft motif. This is a typical style of weaving for this type of loom in S E Asia. I have modified and extended the original pattern. There are 37 pattern rows. As this is an image with a mirror repeat, I needed to store the design to achieve this. I have discovered that the number of bamboo sticks that can be efficiently used to store a design is limited. This was my opportunity to investigate using loops of thread to store the design. I was very familiar with this from Se Asia but had never had the occasion to apply it.

Loops of thread are passed between the long heddles instead of bamboo or dowel. These loops are suspended on hooks attached to a length of wood. For multiple repeats, there need to be a series of hooks at the top and bottom of the storage unit.

DSC06369

See blog October 2015 (second half of the blog) for a full explanation on how to pick up the motif and store a design.

DSC06372

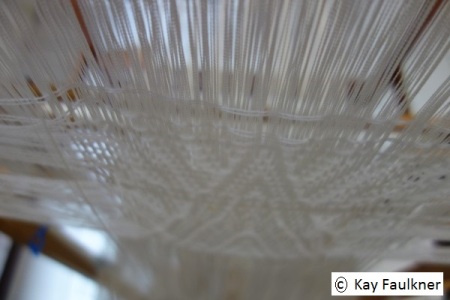
Here’s a close up of the storage loops. Move each one down (or up) to select the next pattern row.

DSC06377

Looking from the top down, the stored pattern can be easily seen.

DSC06389

Two rows of pattern are woven, separated by a row of plain weave. As I suspected, I needed to deselect the pattern lift between plain weave rows. The lift otherwise would be included in the plain weave. Having the storage unit behind the shafts means that the selection does not alter plain weave. The same pattern row can be left selected for however long you wished to weave the same row. In this case however no selection could be maintained. Rather I left the thread loop in position and reloaded the pattern lift for the repeated row. It was a little inconvenient however the ease of storing the pattern made up for this inconvenience. In spite of the double handling of the pattern loop, weaving the reverse of the pattern happened surprisingly quickly. I took nearly 2 days to pick up the pattern and wove it backwards in less than 3 hours with a cuppa included.

DSC06388

Rather than weaving a long runner with several reversals of the stored pattern, I wondered what else was possible.

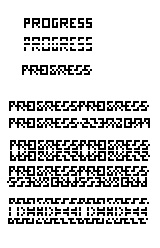
I decided to revisit Becker’s Pattern and Loom and repeat the technique I had already explored. (Blog: September 2017 ) I decided to start with a simplified smaller version of the same motif that I’d been using. Rather than paired threads there were 4 or 6 threads lifted together. The design is interpreted so that each square equals 2 threads, necessary for this technique of changing twill direction to work, so 3 squares in this case equals 6 ends. The front and back of this series are labelled below.

I soon decided that I didn’t like the effect. (A)

Next I reworked the design so that there were only single squares to be lifted. This was then woven in the style outlined in Becker. There is that interesting effect of the sides of the diamond being different. (B)

It was in my mind that the weavers of Cambodia  ( Blog:  May 2017) wove diagonal lines using this loom set up and basic principle. I have this lovely ikat cushion with the diamond ground structure. It is woven in plain weave with pattern shafts.

DSC06437 (600 x 400)

I decided that structurally this would be achieved by including either an extra thread being picked up at the reversal points in the stored design or an extra row being woven in the weaving sequence. This would achieve the outside threads in a series of 3 working in the same manner. I now have a clean diagonal line. (C) The same motif is used for B and C.

The final motif in this series works with a stored lift of 2 or 3 pairs lifted together in combination with a single pair. In essence it is an extension of A and C. One extra thread or row is included at the reversal points. Again the lines are clean. (D)

It is important to note that the reversal points in C and D must be on the same line of the treadling sequence.

Here is the record of that series. A is on the right.

combined2

And then I ran out of warp! This is an overview of all the work from that warp.

DSC06426

The really great news is that all that effort I took in preparing the warp so that individual warp threads pass through single long heddles is done, ready for the next experiment.

DSC06433 (600 x 400)

The Handweavers Guild of Tasmania had invited me to run two, two day woven shibori workshops. One was in Launceston. The other was in Hobart.

Both groups produced an exciting array of work. It is quite amazing what was achieved in two days. Weavers wove on rigid heddle looms as well as those with 4 or 8 shafts.

Here are some images.

The Northern Group.

IMG_4496

IMG_4497

IMG_4505

The Southern Group.

IMG_4539

IMG_4540

IMG_4543

Thanks go to the organisers of both workshops and to the weavers who participated so enthusiastically and with such a willingness to learn.

Coming up next month:

The report on the exhibition.

The studio class on Woven Shibori will be from 18-22 March. There are still places available. Right now I’m working at setting up warps for this class. If you would like to attend and work on a specific project, this is also an available option. There are a number of design approaches being set up but as usual there is often something out of left field.

This loom has been set up to weave an 8 shaft fabric on an 8 shaft loom with a 5 shaft warp shibori pattern using a horizontal storage system. This system is typical of SE Asia. It is a very useful technique for any situation where you need just one or more shafts extra to what you’ve got available.

DSC06421

For full details of this class: woven shibori

The featured image at the top of this blog is an image of the hard copy invitation.


December 2018: More on the work that will appear in the next exhibition.

December 30, 2018

Research has taken me in several directions that somehow have influenced my work. While you don’t get to see finished pieces, I will share research and thought process that I have used.

I have become hooked on visiting Trove, the National Library of Australia web site where I can trawl through old papers. www.trove.nla.gov.au/newspapers. There you can select your choice of state and a whole lot of newspapers come up. Because of the time line that I’ve been researching, I’ve been looking at three: Brisbane Courier (1864- 1933), Moreton Bay Courier (Brisbane 1846 – 1861) and in particular, The Queenslander (1866-1939). It is a fascinating way to pass a lot of time. I can find births, deaths and marriages, a whole lot of classifieds and some interesting articles. I even found one on earth closets (Saturday 10 Feb 1866 pg. 11) I have been caught up in looking at page one and births deaths and marriages.

A look at The Queenslander for 3rd March 1866: page 1, Family notices, provides a typical style of presentation. I don’t always find listings for this area. It’s a bonus when I do.

Please take note of the wording. It can give an insight into the status of women. It also reinforces the perception of the invisibility of women in the mid 1800’s, a theme that I began in the October post.

Births. These are two notices that follow a standard format.

Strachan- on the 26th February, at Cleveland, Mrs JW Strachan of a daughter.

Grenier- On the 26th February, at her residence, Mrs G A Grenier of a daughter.

And then here’s another standard format one that really reflects on the importance of women. It is not unusual that “the wife of Mr………………..” is used. But this one also lists what he does.

Smith- On the 23rd of February, at her residence, Duncan’s Hill, the wife of F. T. Smith, builder of a daughter.

Marriages

Here’s one for my area:

McLeod-Gray On the 24th February at Cleveland by the Rev Lacy H Rumsey, M.A., Edward McLeod, Esq of Cleveland, to Hannah, widow of the late Walter Gray Esq of Ipswich.

Deaths

There were 6 deaths listed: 4 children and 2 women. Again here are 2 typical formats. Sometimes the wife gets listed in the death of a child, while at other times there is no mention of the mother. It is sobering to read of the child’s age in the mid 1800’s.

Bartley- On the 1st March, James Norman, youngest son of James and Mary Ann Bartley, aged 12 months.

Hawkers- On the 1st March at the Military Barracks, Emily, infant daughter of Sergeant Hawkes, 12th Regiment, aged 22 days.

And then one contemplates how life has changed. Thank goodness for improvements in medicine and medical practices. Thank goodness for improvements in the status of women and thank goodness for the things that have made daily life that much easier. Progress indeed!

When I first started spending many hours in the Cleveland Library I came across old maps and references to roads.

Early white explorers often followed aboriginal tracks that later became roads. The current Mt Gravatt- Capalaba Road is one such example.

Before there were roads into this area, supplies had to come in by boat, a very treacherous undertaking. There were many instances of boats being stuck or overturned. At one stage Cleveland was identified as becoming a port. Squatters coming from Warwick area through Cunningham’s Gap were keen for it to be a place to ship wool from, until there were one too many mishaps. An early explorer, Alan Cunningham had an 1829 sketch that showed a “road”.

IMG_4306 - Copy


This 1861 map shows both “Old” and “New” Cleveland Road and identifies the “road” as being “a line of trees marked on either side of the Road- being one chain long”. Both roads are still in existence. Over time roads were improved. Bridges built over creeks that needed to be forded especially in times of flood. Drays, mail coaches pulled by horse and bullocks were replaced by early cars. Early settlers required roads.

This drawing of early roads came from a publication “The Cleveland Roads to 1900” and shows how Cleveland was connected to Brisbane.

IMG_4315 - Copy

The roads of course brought more settlers to the area. Progress came.

Of recent time there has been much discussion in the news about development in this area and the need to allow for growth of more people and the ensuing impact on the environment.

And again one reflects on what we call “progress”.

What can I use to symbolise progress? What can I use to symbolise “development” and to identify the mark that both early development and those who came after have left on the land?  There seems to be a link between progress, roads and thereby tyre tracks. Tyre tracks are also impermanent: they can be washed away or covered up by whatever comes next.

Then the fun began! For inspiration, I collected images of tyre tracks and played with printing tyres. Sometimes one just has to play to incubate ideas.

Bike tracks on the beach with a delicate pattern made by a small crab.

IMG_4434

Car tracks in dried up mud.

IMG_4445

A print from a car tyre. My son just shook his head over what his mum sometimes gets up to. It was his tyre.

IMG_4438

This led me to thoughts of developing profile drafts using the word “progress” and to use this to replicate a tyre print format. This is some developmental work.


progress 2b

This is detail of the woven profile using two tie unit weave or Summer and Winter. It’s such a great structure for weaving imagery. How this sits in the whole piece will be unveiled later. At this stage it’s very difficult to identify the word, progress. I guess you sometimes just can’t go back in time.

DSC06023

Lastly, another bit of experimentation. This again links in with where I live and it is in a very physical way. The Redlands is named that for a very good reason. It has red dirt. Originally all this area was productive farming. What was once prize agricultural land is now covered in housing. Now there are just a few isolated farms in the middle of suburbia.

DSC06286

I have been experimenting with mud dye. It might be interesting to add this to my story. Here it is applied to a sample of woven shibori and then undone. Fresh soy milk was used as a binder.

DSC06263

Isn’t it a glorious red brown? Base fabric is a cotton warp and linen weft.

DSC06266

Eventually all these separate threads do come together. All will be revealed in March.

parallel title        An exhibition celebrating 20 years of woven shibori with Catharine Ellis. 10th March- 14 April 2019, Redland Art Gallery.

Classes begin in the New Year. In just a couple of weeks there will be Linen and Lace. Check out the rest of year’s classes here.


November 2018: Studio classes including woven shibori and continuing behind the scenes for my next exhibition

December 2, 2018

This month’s studio class was Woven Shibori.  Barbara, Ronda and Judy worked on class projects in a variety of fibres, structures, effects, warp and weft shibori, in fact a whole range of techniques that could be fitted into 5 days. Jan worked on her own project. She had attended last year’s class and wanted to extend that work.

Here are some images from the class. It was a very successful week. Sometimes students chose to weave a project from a warp. On others they chose to explore a variety of approaches and completed a sampler. The choice was theirs. As a result they went home with a collection of samples and projects and let’s not forget a whole collection of weave drafts.

Weaving: A variety of looms used including the draw loom.

DSC05957


Pulling up.

DSC05958


Dyeing: watching the magic of indigo.

DSC05960


Undoing:

DSC05961


The results:

Indigo.

DSC05962


DSC05986

permanent pleating (not the bottom scarf).

DSC05963


the acid dye bath


DSC05964

DSC05997

Jan had to leave mid-week. Luckily she had finished the weaving of her rag rug but will return at a later date to finish the shibori process.

DSC05976

One of the things that was considered in Colour in weaving, the October class, was the repeat that happens when yarn is commercially space dyed. We often pick up cones of yarns that look interesting and then wonder what we are going to do with them. The length of the repeat on this cone of space dyed yarn just happened to nearly match the width of a left over warp. So here was an opportunity to weave a space dyed yarn as weft ikat. As this was a shibori class I also wove it with a resist.

DSC05947

DSC05941

Once the resist was pulled up, the fabric wanted to curl due to the resist being unbalanced in float length. So I worked with this, wrapped it around a rope and bound it before dyeing.

DSC05951

Of course it ended up in the indigo which of course it was always going to overwhelmed it. I must admit I do like this fabric much better than the original because that red, white, black ikat is so subdued.

DSC05970

DSC05972

Upcoming studio classes for 2019. All classes are limited to a maximum of 5 unless otherwise identified. Details under Kay’s weaving school.

21-25 January 2019          Linen and Lace.

18-22 March       Woven Shibori

13- 17 May          From a twill threading

10- 14 June         Special- own choice.

9 – 13 September            Colour in Weaving

21-25 October                   Weave a floor rug (class size limited to 3)

18-22 November              Double weave and friends

9-13 December                 Special- own choice.

BYO Loom one day a month class will continue next year.

Marja has been coming for the past 3 BYO loom classes. She had never woven crackle, so here was the opportunity to explore. As well as weaving a project a month, she has also come to understand the structure and how it is drafted.

IMG_4370

parallel title

The ongoing saga that was begun last month for the exhibition celebrating 20 years of woven shibori with Catharine Ellis.

At the start of the month: Hot off the loom. I look at this pile and I am overwhelmed- not by the quantity of weaving that has worked out really well but by the amount of resist soon to be pulled up. And then I wonder in over 20 years how much resist would have been pulled up. This exhibition is a cause for celebration! Onward….

DSC05937


Weeks later. The fabric lengths were finally all pulled up and ready for the dye baths. I decided that I wanted to get a range of colours to signify age. The colour had to come from sources that identified age to me.

I used pomegranate that I have had in my garden for probably well over 20 years. The original seed for this ornamental (unfortunately it can’t be eaten) came from my Grandmother’s property (50 years + ago) and then to my mother’s garden. I think that there is a lovely parallel there with my matrilineal line.

DSC06010 (600 x 400)

The other dye source came from the old Tallowwood, Eucalyptus microcorys that grows beside my fence. It has been here a very long time. It was a very mature tree when we moved in 40 years ago so would have to be well over 100 years old possibly older than 200.

DSC06009 (600 x 400)

Tallowwood were a predominant tree of this area before settlement. There is this wonderful example at a local nature reserve.

IMG_4362

This tree is protected and is over 400 years. It was never felled because it had been deformed by lightning when it was about 100 years old but it certainly gives a feel for what this landscape may have been like. I can just imagine the early settlers struggling through the scrub with these and other large trees dominating.

From these two sources, I required 8 different colours. These were obtained by the use of mordants (tannin + alum), the two dyes and a dash of iron. Pomegranate doesn’t technically required a tannin pre-mordant but I did add to help shift the colour for two dye baths. The tannin pre-mordants were tannic acid obtained from oak galls and myrobalan. Because pomegranate is so high in tannin, I also used it as a mordant for one of the Tallowwood baths. Usually I would add a dash of iron to make the colour muddier. In one case it was liquid from a collection of rusty bits that I found and that had been soaking for at least 2 years. While the mordanting was very measured according to weight of fibre, the dyestuff, proportion of them and the quantity of iron certainly weren’t. Here’s an overview of the dye combinations for the 8 colours. As you can see I aimed to cover different combinations of the basic elements.

  1. Pomegranate, no tannin, iron
  2. Pomegranate, tannic acid, iron
  3. Pomegranate, myrobalan, iron
  4. Pomegranate, tannic acid, iron
  5. Tallowwood, pomegranate, tannic acid, iron
  6. Tallowwood, myrobalan
  7. Tallowwood tannic acid
  8. Tallowwood, tannic acid, soaked iron liquid.


The tallowwood leaves were collected whether fresh or old, covered with water and soaked for a day before being boiled, strained and reused. I did not retrieve these for the next bath.

DSC06003 (600 x 400)

DSC06006 (600 x 400)

To prepare the pomegranate bath, I collected both old husks and fruit- whatever I could find, covered it with water and left for a day or so. Before dyeing, the mixture was boiled and then strained. The fruit was returned to the bucket and soaked again till the next day of dyeing. The dye process took well over a week. It is interesting to note that the recycled pomegranate continued to give equally strong dye on each progressive dyeing and that there was still plenty of dye to be extracted by the time I was finished with it. I must admit the odour was pretty strong though luckily hasn’t stayed in the fabric.

Here’s the end result showing the variation in colours though you will have to wait to see what the finished pieces look like till the exhibition.

DSC05985


At the end of April 2018: profile drafting and weave structures among other things.

May 6, 2018

I have been on an adventure to western Queensland. No, this blog will not be about that but in passing I will mention that I’m sure that the colours, textures and history in particular will find expression sometime in my work. The Longreach and Winton areas are extremely interesting destinations.

Rochelle spent a couple of days in the studio and finally finished her gigantic double width blanket. She has promised to bring it back totally finished. I bet it will keep her warm as toast. A reminder for others out there: the studio is available on a negotiated basis for students to come and weave.

This month’s studio class was Beyond Basics where we started with profile drafting and extended into structure. Jen and Hilary, both from Western Australia, produced a quantity of weaving files and actual weaving. This is an overview of the 5 day class. All the warps had the same profile drafts for the treading, while the treadling was based on each students profile draft. In this way all the samples related.

There were several hours spent on creating weaving drafts.


Jen weaving Atwater Bronson lace on a wool warp with a silk weft.

Hilary is weaving twill blocks on a draw loom. The pattern shafts are arranged as for the profile draft. What a great way this is to promote understanding of how profile drafting can be used. It’s also a fun experience.

Fabrics include 4 and 8 shaft overshot, crackle, atwater and bronson lace, summer and winter, twill blocks. The following images were taken late on the last day when the lighting wasn’t all that good.

Jen’s collection:

Hilary’s collection:

Congratulations to both. They have some very beautiful results and all projects are totally finished. It was a great 5 days. What a lot of work they did!

There was enough warp left over on two of the “overshot” looms for me to play. There had been much discussion on the length of supplementary weft floats when weaving overshot. So the challenge was for me initiated by the students was to find ways to make use of these long floats to make interesting fabrics. I’ll share these 3 experiments. It was a great way to clear the looms and to enable students to really appreciate the potential of a structure.

Of course there’s always woven shibori. Any structure that achieves long supplementary floats is ideal for converting into weft shibori. Eventually I will get around to dye this hand towel.

This hand towel uses just one block of supplementary weft which are then stitched into groups once removed from the loom. It’s a pretty effect.

When weaving multishaft overshot (a 4 shaft profile draft converts to 8 shafts of structure) each block can be woven independently. This meant that I elected to use just the half tones with just weft floats on the front to weave this fabric. The pleating will stretch because of the wool/lycra yarn that was used. The finished result and the reverse side and before laundering.


I thought the weavers may enjoy my installation. I had acquired these very rusty reeds over a number of years. Here, at the entrance to the studio, was the opportunity to do something with them.


Next month: There will be no studio classes. I’m getting ready to set off on another textile adventure.


February 2018: Linen and Lace, Woven Shibori and other stuff.

March 5, 2018

In the studio this month I held the second Linen and Lace class. The class was nearly full with 4 students. That is why this follows on from #1 in January. There were great results again. Here are some images of work by Karen, Jen and Jan. It is worthwhile to note that two of these are fairly new weavers.

They wove. Karen is missing from this photo.


And they finished off. Here a Swedish Lace series is being mangled using a marble rolling pin.

And went home with a great collection.

Jen’s collection


Karen’s collection


Jan’s collection.

Rochelle after attending #1 decided that she’d like to weave a double width alpaca blanket, so she had the opportunity to also refresh on the theory… and to check out what the others did.


One of the additional challenges of this week was to experiment with pick up on lace weaves if time permitted. In this way all could come to an understanding that more complex design could be achieved with minimal shafts. There are some projects in both Jen and Jan’s collection. Having the loom threaded that way also allowed me to play with a couple of combinations both while the class was underway and afterwards.

On the Bronson Lace warp students could accomplish pick up of a design for an overall pattern or combine it with inlay. I got to weave these two examples.


For those interested in drafts, here it is.

The other pick up warp was on Spot Bronson. Jen got to weave a complex spot Bronson design while I got to play with combinations afterwards. This is my playtime, all off the one warp.

I threaded that one so that both lace and Summer and Winter could be woven at the same time. Jen got to weave a complex spot Bronson design while I got to play with combinations afterwards. I also wanted to revisit the experimentation I’d done with doupe leno from the previous workshop. So it was a 3 way challenge and a bit of forward planning was required.

Here’s the basic draft.

Spot Bronson and Summer and Winter combined. Note as well as being woven full width, there’s an isolated motif in the middle of the lace weave.

To weave the leno, I required a group of 4 threads per dent if I was going to explore more doupe leno stored on an additional stick. My aim was to compare the method that I’d used in the previous month on a countermarche loom with this on the jack loom. However the loom had been threaded 2 per dent. As I knew that I’d be taking advantage of this warp I used a reed where I could remove the uprights allowing me to maintain the sett while achieving 4 per dent. Part way through increasing dent size.

An overhead view of this reed. Once I’m finished, I slide the brass strip back into place securing the reed.

This image shows the leno being picked up. Note the wider spacing has also grouped four threads across in the plain weave.

Preparing one group of 4 to be placed on a doupe. More about this process can be seen on January’s post. I found this process much easier to weave on the Jack loom. The important thing to remember is to put light tension on the pick up leno shaft as each row is woven. It prevents doupes being caught as the shafts change.


The finished leno.

On modifying my reed spacing: One might ask why I just didn’t use a reed with wider spaces to start with. So for the last experiment, I also wove a piece with leno (pick up alternating) and Spot Bronson as an all over pattern. While weaving the threads were very much isolated in groups of 4. After finishing, the warp threads are more evenly spaced. However while weaving, because of the denting, it was impossible to beat the fabric to square as a result the lace floats are elongated.

Here’s the finished collection from that experimental warp.


At the end of this month I was invited to teach at a weaving retreat for 5 weavers at Sewjourn, just north of Melbourne. They had chosen woven shibori as the focus for their study with a bit of additional dyeing tossed in.

Sewjourn is a perfect location for a small group. It has well set up and basic accommodation where you self- cater and a great studio space, set in a rural location. Those weavers sure can cook!

It was an amazing 5 days. Congratulations to Trudi, Di, Jillian, Elizabeth and Kaye. Here are some images.

The studio. Weavers hard at play (aka work).

Some fibre reactive dyeing both as painted warps and pulled up woven shibori.

Different shades of blue from the indigo bath.

Completed dyeing of warps (painted and ikat) and small skeins for weft ikat.

A weft ikat being woven. While the focus was on woven shibori, it was too good an opportunity to see how this would weave up.

The result of a fabulous five days of play.

Next month: In the studio there will be a 5 day class focusing on all manner of twills. There are still 2 places available.


November 2017: A woven shibori studio class and textile exhibitions in Canberra, Bendigo and Tamworth.

December 4, 2017


Philip and Annette spent 5 days in the studio working with various woven shibori techniques. Looms were pre-threaded with both warp and weft shibori and different fibre/yarns combinations to explore as wide a range of techniques as possible.

Firstly fabrics were woven that incorporated either a supplementary weft or warp thread.

DSC05037

These threads were then pulled up very tightly. Hopefully the area that is not exposed will not be accessible to dye. Annette is pulling up one of her samples.

DSC05041

After dyeing these threads are pulled out exposing a dye pattern. Philip is in the process of removing his resist. The fabric is opening up to reveal the pattern.

DSC05047

Once undone, the work was washed. Here’s a collection on the line.

DSC05060

and closer details of work.


Some of Philip’s collection, hemmed and totally finished. Annette had to leave early so I don’t have an image of hers.

DSC05064

This month I was also fortunate to see some significant textile exhibitions.

There were two exhibitions in Canberra celebrating 50 years of the Canberra Spinners and Weavers. Crossing Threads can be found at the Canberra Museum and Gallery. This is a retrospective exhibition and it was wonderful to see the depth of weaving practice over past years. This exhibition, curated by Meredith Hinchliffe is on till 18 March 2018. www.cmag.com.au


At the same time, The Canberra Spinners and Weavers hosted an exhibition, 50 Years Looking Forward. This exhibition is of current member’s work and also curated by Meredith Hinchliffe. The work was beautifully presented and included a great diversity of well-crafted items. Congratulations to all involved. This exhibition closed on 25 November www.camberraspinnersandweavers.org.au

I was delighted to be able to be in Bendigo and see The Costume Designer: Edith Head and Hollywood. I had head an interview on ABC radio and went with great expectations. This exhibition did not disappoint. It is an extensive and includes images and movies of costumes, drawings, quotes, background information on her design process and of course many costumes. It’s on till 21 January 2018 and I’d highly recommend you get to see it if you can. www.bendigoartgallery.com.au


The last exhibition was the 3rd Tamworth Triennial. Tamworth has had a long tradition of hosting high quality and often cutting edge textile exhibitions with often work by world acclaimed textile makers. At first a biennial since 1975, it is now a triennial. It has had a remarkable reputation so I went with great expectations. I was so disappointed! There were a few pieces that provided interest but in my opinion the overall standard certainly wasn’t of a standard of past exhibitions. It’s on till 10 December at the Tamworth Art Gallery. www.tamworthregionalgallery.com.au

And a closer look at work by Jeanette Stock, Meredith Woolnough and Sally Blake.


I have released the start of next year’s studio classes. Check out www.kayfaulkner.com.au or this blog for more details. There’s more to be posted.

8-12 January (4 places left) and 19-23 February (1 place left) Linen and Lace

26-30 March (provisional) From a Twill Threading.

30 April- 4 May Beyond the Basics

11-16 June Special

6-10 August Two ties or Summer and Winter


September 2017: Student work + John Becker’s book/Weaving informed by S E Asia.

October 4, 2017

I’m in the studio this month. This blog covers both student work and some research.

Scheduled was a five day studio class in Double Weave. For two weavers: Sharon and Marja this was their focus. Looms had been pre-threaded so that they could just weave. However there were theory and design activities often revolving around what they were actually weaving as well as developing an awareness of the diverse range of applications that were possible. The following are some images from the five days and a sample of what was attempted and completed. There was more but I missed taking some images.

IMG_2044

Sharon weaving layers.

IMG_2051

Marja wanted to master double weave pick up for imagery. She did!

IMG_2057

Windows of colour being woven: double weave blocks.

DSC04983

From the same warp, their own designs on an off sett layer.

DSC04987

Just a bit of fun: layers that swivel.

In addition to the scheduled work in class, Sharon took the opportunity to pull up and dye her fabric woven in the previous class. The technique was warp shibori woven on a warp of linen/cotton with a silk noil weft.

IMG_2073

The warp has been pulled up and dyed. Shown here is Sharon undoing her resist.

IMG_2080

This fabric is destined to become a blouse.

At the same time that Sharon and Marja were weaving double weave, Rochelle continued with her bird in Theo Morman.

DSC04971

By the second day the weaving was completed. Now there is thought being given to the next steps in completing this wall hanging and a single repair to make. It is a gigantic achievement for a first time weaver.

DSC04991

For her second warp, Rochelle decided to weave a throw in alpaca, plain weave and checks. Here it is finished in 3 days.

These weavers sure got through a lot of weaving and can certainly be proud of their efforts. I was certainly impressed by their dedication as they took full advantage of the studio hours. Of course while they were committed to what they were weaving, there were times of wonderful companionship and laughter. Special friendships have been formed.

Some may question why Rochelle got to do other things than the listed course: double weave. I can be flexible. My aim is always to accommodate weavers who want to learn- no matter what the topic is. First in with a booking will always be welcomed. And if one class fills on a designated to a topic (remember class size is strictly limited), then I can always list a second.

I have been “playing”. It’s always a good idea to take time off every now and then and explore a topic or do something different.

So what has….

IMG_2101“Pattern and Loom” by John Becker,

DSC04602

my experiments on a countermarche loom with long eyed heddles, and a Laos style vertical storage loom or what I refer to as my hybrid loom and

DSC00337

this technique using horizontal pattern storage from Vietnam/ Thailand/ Laos, got in common? Opportunity!!

Firstly this is a new, second edition of John Becker’s book published in 2014 by NIAS Press. The information is basically the same but it does have a different layout and in particular a better size of illustrations. I am enjoying this edition which does away with the “need” to have the two parts of the original (below) which has the larger diagrams and drafts in the second “half”. Note that this edition has “with the collaboration of Donald B. Wagner” on the cover. It is due to his effort that there is an updated version.

IMG_2117

This is the original edition with the two halves. The diagrams in the main book were difficult to read so having the second supplement was beneficial.

I was having a look through the new edition and not having gone very far was very excited to see a technique that was running parallel to some research that I was intending on following. There is this textile that is in my collection and that was intriguing. What I knew about the process in its weaving had commonality with what I was seeing in Becker. I won’t show that textile now as it will come in another post and will only muddy the waters now. However this and what I saw in Becker has sent me off in a new direction of “play” on the hybrid loom.

My hybrid loom had the remnants of a long warp. It has been used for previous “play” at the start of the year. The one thing that I have discovered about this loom is its great flexibility. Here was an opportunity to use it in a different way and maybe finish the warp. I will need to use it as a conventional countermarche loom for weaving rugs in a month or so and this warp really does need to be finished.

The technique I was about to explore is on page 22 in the new edition for those who have it but it is also in the older one. The technique is from the Han Dynasty of China (206BC to AD220). Yes, it is also fascinating because it is so old.

It uses one shuttle for weaving and combines plain weave being woven on two shafts with pattern being picked up and stored. The result combines a pattern in warp faced twill on a plain weave background. Structurally it is excitingly simple.

Becker for blogThe book also shows a horizontal storage system being used. However, I also knew that I could store it on the vertical storage system. Initially this is what I used.


IMG_2104

The pattern is picked up in pairs, transferred to behind the shafts and stored.

DSC04954

I have used the vertical system to store a single diamond motif. This may be used to weave the start or end of the entire motif. I started with this system because it was something I was familiar with.

But here was the opportunity that I’d been waiting for. I would also try out using the horizontal storage process. It’s been on my “to do” list for a number of years. I wanted to understand its advantages and limitations. When asked in Laos why you would use one rather than the other, I had been told that the vertical storage has the capability to store a much longer warp. But how easy is it to use the horizontal system? What are the advantages or disadvantages? It’s usually only by actually using the loom that you can understand how it works.

IMG_2108

But then I took up the challenge and used the horizontal system. I learnt that the pick up requires the making of half heddles and got fast at doing half hitches. This is different to what is shown in Becker but in keeping with where I needed to go. Becker uses pre-tied loops. The knotting of half heddles with half hitches is quite efficient. This system also requires less yarn in creating the heddles than the full loops used by Becker: therefore less opportunity for tangles. I have also taken on board the heddle support rods that I had noted in Laos and Thailand. Using these created a mostly clean lift with few tangles and a very convenient way of keeping them in sequence.

Once the design was picked up and stored, weaving progressed reasonably quickly. To weave the design all I had to do was raise the heddle bar, transfer the pattern to behind the reed and weave two rows of plain weave.

DSC04997

The first design is woven. It’s interesting to note that when the direction of the pattern lifts are reversed and providing the same weaving sequence of two rows of plain weave for each lift is maintained, then each side of the motif looks different.

DSC04995

Here’s a closer look. I like that both sides of the design are not the same: left to right and bottom to top.

DSC04998

And a second one using a different coloured weft. Note the different twill direction.

This second towel uses a different plain weave sequence. Weaving with the left and then the right treadle now becomes right then left and the direction of the twill line changes. Logical but fascinating!

And there’s still  enough for one more “play”. And that will be revealed next month.


June 2017

July 17, 2017

This has been the month for exhibitions. I know this blog is very late but much has been happening as you’ll see in next month’s blog. In the meantime….

I have delivered my touring exhibition, Pattern – A Universal Phenomenon to Childers Art Space. It will be opened on the 11th July and will run till 3rd September. This will be the last opportunity to view this exhibition. Its tour of 4 years is finally coming to an end. CHARTS is an interesting space with a glass wall commemorating the fire in the Backpacker’s several years ago where many lost their lives. That in itself is an interesting memorial to see. I will look forward to seeing how it sits in the space at the opening. Check out CHARTS at http://www.bundabergregionalgalleries.com.au

Also on right now is Stitched Up, an exhibition on at The Lock Up in Newcastle. It’s a group show which includes 24 National and international fibre artists as well as some local input. I was honoured to be asked to participate.

DSC04890

A section of the gallery space with my work on the left.

It has been a fascinating project and, for this blog, I thought that I would share my thought processes on producing this work.

The exhibition is a collaboration with The Lock Up (www.thelockup.org.au) and Timeless Textiles (www.timelesstextiles.com.au). It marks the 150th anniversary of the Industrial School in Newcastle being established. (1867-1871)

In the four years the institution operated, 193 girls from two and a half to 18 years of age were admitted. They were taken from their families, if they had families, and incarcerated as a consequence of the Act for the Relief of Destitute Children, which targeted youngsters who had committed crimes, were destitute, neglected, delinquent, uncontrollable or living in the care of thieves and prostitutes. The Industrial School sought to educate them in literacy while also teaching them sewing and needlework, skills that would increase their chances of employment as domestic servants.(Timeless Textiles)

The conditions in the school were needless to say pretty severe and very much a reflection of that sort of institution of that era. The school became notorious because of the conditions and rioting.

As artists we were provided with the background information of the school and the case studies of some of the inmates. This research was done by Jane Ison. (nis.wikidot.com)

We were asked to select a girl and respond to the information to celebrate her life.

When I was reading through the girls’ histories I was struck by many similarities. Fate or Destiny celebrate the lives of Margaret Poole and Rachel Willis. The following is the information that I worked with based on the research by Jane Ison. Both are very much a reflection of life at the time of the Gold Rush and for a certain demographic of society. I found their backgrounds fascinating. Maybe you will too.

Rachel Willis

Father- Thomas aka William Willis (b 1810). Mother – Eliza aka Elizabeth, alias Mary Kennedy (b 1828). They married in 1844 and had 10 children: 5 boys and 5 girls. Rachel aka Margaret was the youngest, born 1860.

Thomas either died or had abandoned the family sometime prior to 1868. Her mother resorted to keeping a brothel. It is thought many of the siblings were fostered out.

Rachel came before the bench on 24 February 1868 after being taken from a brothel and was released back into the care of her mother as “the bench was not satisfied that the evidence as to the character of the mother” justified removing her. On 2nd July Rachel again came before the bench. By this time her mother and eldest sister were in jail for “keeping a disorderly house”. She was being cared for by a person named Dunn who had reported that they were unable to keep her but as she was taken from the house, the bench was unable to act. Two days later she was found entirely destitute on the streets. She was aged 8.

She was a resident of Newcastle between 1868 and 1871 when she was apprenticed to an older married sister. In 1878, aged 18, she married Mackie Wilson (1854-1942). They had two daughters and two sons with 1 son dying in infancy. She died in 1893 aged 33. Cause of death is unknown.

Margaret Louisa Poole /Pool

Father, Robert Poole (1812- 1872) and Mother, Mary Leonard (b. 1815) were married, probably bigamously, in 1852 in England. Robert had been married once before with 3 children. He abandoned his first family. Mary was a convict and had been married twice before and was widowed both times. She returned to England with her second husband after being pardoned leaving 2 of 3 surviving children behind and fostered.

Robert and Mary arrived in Melbourne as unassisted migrants in 1852. Three girls were born in Australia. Margaret was the middle child, born in 1855.

Her mother died in 1860. She was aged 5. The sisters were separated one apprenticed and one fostered to a step sister. Margaret was living with an associate of her father. Betsy Harvey is listed as a step mother.

Margaret was 12 when she came before the court in rags on 31st August 1867. She was” much neglected and half starved”. Her parents were described as “very dissipated characters” and Margaret was charged under the Act with living with two common prostitutes.

She was a resident of Newcastle between 1867 and 1870 when she was apprenticed to magistrate at Scone. In 1872, the family’s circumstances changed and she was re apprenticed.

On 26 January 1875, aged 20, Margaret married William Ison (1852-1936). They had 10 children with 7 surviving infancy- 5 of 6 sons and 2 of 4 daughters. Margaret died on 2 January 1887 in childbirth aged 32.

So how was I going to take this information and use it?

I decided that whatever I did, it needed to tell their story. The cloth that I would weave was to be a story cloth with words embedded into the actual story. It needed to be able to be read. The cloth also needed to represent age as this story did happen 150 years or so ago. It needed to include stitch as that was the skill they were taught; let alone the title of the exhibition. Ideally it should also reflect on all the girls who passed though that institution.

We were also sent a swatch of fabrics similar to what research had showed that they might use. Of course I wasn’t about to use a commercial fabric when I could make my own. But I did have some natural cotton that would weave fabric similar to calico. I had a starting point. I needed a second yarn that would not dye as I wanted to have some definition to imagery post dyeing.

I knew the finished dimensions as we were given those and that there would be two pieces. So I knew the size of each piece. I knew the yarn and therefore the number of warp and weft threads that I would be using. That’s simple maths. So then I knew that the “words” that I would use needed to fit into this. I needed something of around 210 letters and spaces that would use about 2200 weft rows. So I need to achieve a somewhat shorter version of their lives that would be used to create a weave draft.

In addition I wanted to weave in “stitching”. Some of this would be left in while some would also be used for woven shibori. This could then reference the fact that what happened in their lives created their life “pattern” in much the same way as aged lines on a face and body.

The following shows the fabric being woven. The story can be read on the diagonal in either direction. Note also the heavy cotton supplementary weft that will be used for woven shibori and that will create the dye pattern. (It’s easier to read the words on the fabric underneath.)

DSC04672 (600 x 400)

The fabric was then dyed. I have used natural dyes of various forms and my choice was influenced by “age”. The resulting shades of brown are similar to the notion of grubby aged cloth: the cloth from the streets before they went to the home as well as stained cloth found from times past.

The stitching threads were removed from the “figures” and some left in to define their edge. It also makes the fabric look more “aged”.

20170628_121950

Close up of fabric showing dye pattern, stitching and woven words.

20170628_121832

Artist Statement: Fate or Destiny

These shadowy humanoid silhouettes represent two girls who were inmates.

Was it predetermined by fate and their backgrounds that these girls would end up in The School. How much of what the choices they made with their lives resulted in what they became?

When I read the inmates’ stories I was struck by how many had similar stories. I have chosen two girls and have woven story cloths. Their stories are impregnated into the actual cloth. It can be read. The process of uncovering their stories equates with your search to read them.

Here’s the synopsis of their lives which can be read diagonally in the cloths.

Rachel Willis. Father- Thomas. Mother- Eliza. Father left or died. Mother jailed as prostitute. Rachel age 8 homeless. The school. Apprenticed 12. Married 4 children. Died 33.

Margaret Poole. Father – Robert. Mother – Mary. Middle child of 3. Mother dies. At 12 charged- Living with prostitutes- associates of father. The school. Apprenticed at 15. Married-10 children. Died 32.

The full research into their lives provides a more in-depth insight into their life stories.

These aged cloth represents life of a different era with different social pressures. Both of these girls were charged because of their contact with prostitutes. It was only by being charged that they then escaped their living conditions and were sent to the school.

Stitch is a skill that they were taught. In much the same way that these stitches have created pattern and texture on these cloths, did these skills have any effect on the direction their lives took? One hopes that The School, in spite of its history, gave the girls a chance of a better life.

The following show some additional close up images.

20170628_121950


20170628_121935

20170628_122140

20170628_122233

It has come to my attention that I have made the Top 100 Weaving Blogs. To check out who is in the 100 go to: http://blog.feedspot.com/weaving blogs/. I am delighted to be listed.


December 2015

December 31, 2015


My studio is nearly finished. What a very nice way to end the year. I am so looking forward to working in this space. To do is some tiling and then to move looms. It should be finished for the first class in the New Year. Here’s progress this month.

DSC02133 (600 x 400)

The painting gets done. I say goodbye to the purple wall. I need light in here to work.

DSC02138 (600 x 400)

The painting is finished.

DSC02144 (600 x 400)

And the very next day, we had heavy rain. The gutters overflowed but there I was dry inside.

Kathryn, Barb, Ann and Maggie were in the studio at the start of the month. They worked on independent projects with great results.

Kathryn experimented with 4 layers of weaving, swapping the layers around to achieve different effects.

DSC02099


DSC02129

Ann explored different 4 shaft twills.

DSC02108

Barb explored twills on 8 shafts.

DSC02117

Maggie explored woven shibori  with shirts that had been cut up.

DSC02103

Here she is pulling out the resist threads to reveal the dyed pattern.

DSC02110

Fabrics washed and hung out to dry.

DSC02120

A very important part of any workshop is time out.

DSC02097

In this Festive Season, I’ve had a lovely few days weaving in the new space. I’ve got that warp to finish off.

For this next experiment, I had rethreaded the original warp on 4 shafts as I wanted to see how it would perform. The loom action for those of a technical bent is counterbalance (when two shafts go up the opposite two go down linked by a pulley system) I’d also increased the spacing of the warp. I also wanted to explore was the effectiveness of using normal treadles on this loom. Two sticks of wood as treadles were very floating and of course have a tendency to move. Maybe fixed treadles would make for more effective weaving. I have taken bits from a couple of looms to rig up these treadles. The original ones were very heavy. I knew I would have issues working the vertical storage component if it were too heavy. Of course it was much easier to weave. By the way the extra horizontal bars will be necessary if I’m to do any sort of patterned four shaft weaving.

DSC02147 (600 x 400)

I got to weave about 30 cm of plain weave before I came to the pattern area. OOPS! These treadles even though they are as light as possible make moving the picked up pattern to behind the shafts just way too difficult. There’s just too much weight. So back to the drawing board and I have put back on the bits of wood. Four shafts tied directly to the treadles. It works!

DSC02148 (600 x 400)

A comment would be though that it is much easier to transfer the picked up pattern when there are only 2 shafts. Having 4 shafts would have meant that I could do some extra patterning similar to what I had done on the draw loom. What I’ve tried here with the treadles and their inherent weight problems will mean that I’ll need to find an alternative to make that possible. Some features of a western style loom are not as efficient in this case as the original Laos loom.

Here’s my 46 stick pattern. This is a much more complex pattern than I have previously used. The piece of paper attached to the beater makes seeing the threads much easier. The purple against the dark wood is really hard to see.

DSC02153 (600 x 400)

Note the series of pattern sticks storing the design.

DSC02154 (600 x 400)

Here’s a quick preview of some of the classes starting in the New Year. Full details of these and others will be posted under “My School” soon.

18-22 January. Linen and Lace.

22-26 February (5 days) or the weekends of 20/22 and 27/28 (4 days)    From profile to structure

25-29 April         East Meets West and more

23-27 May          Networked Twills.

27 June – 1 July               Special

19 – 23 September         From Parallel Threadings

This time last year I was in Canada experiencing snow. I have my own snowflakes. They seem appropriate for here.

DSC02151 (600 x 400)


August 2015

September 7, 2015

The blog this month covers workshops and then more on my Great Experiment.

But firstly a gathering of friends and another studio celebration. Cathy and Peer Moon donated a mutual friend’s loom. They had Marjorie’s loom in storage for quite some time and decided that it needed a new home. It will be a very useful addition. By the end of August there were students weaving on it – you’ll see it in action later on. At the same time Janet de Boer selected work for The Director’s Choice exhibition at Gallery 159 to be held in November.

DSC01509

Cathy and Peter Moon, Helen Barnard and Janet de Boer celebrate amongst the looms.

The Gold Coast Spinners and Weavers Guild hosted another workshop at Bornhoffen. Apart from an excellent venue for a workshop why wouldn’t one come here?

DSC01513

The topic was Colour and Weave. About half the students elected to work in a round robin while the others elected to work on individual projects.

The following are some images from the workshop. Firstly there’s some general images, then the results of the round robin. Each warp was divided up so that students took their own samples. Then there’s individual student’s work.

DSC01515

DSC01514

DSC01522

DSC01528

DSC01540

DSC01555

DSC01552

DSC01557

DSC01551

DSC01561

DSC01526

DSC01562

DSC01563

DSC01564 b

It was a highly successful workshop. I am impressed by what was achieved. It was also great fun.

The first weekly class has finished with very satisfying results. There were 3 students, all inexperienced.

In 5 weeks Maxine completed two projects.Firstly an introductory project where students learnt a variety of basic skills.

DSC01594 (600 x 400)

And then a project of her own choosing. It was going to be vest material but Maxine decided it was just too beautiful as it was. A great effort!

DSC01601 (600 x 400)

Melissa examines her project. There’s a lot of information here: lots of different structures and an exploration of colour. Another great result.

DSC01599 (400 x 600)

Isn’t this a great result? Fleur knew she wanted to weave but had never seen it done. I’ll look forward to seeing them finished. Her work was much admired by these weavers,

DSC01621 (600 x 400)

Marg Barnett, a wonderful shibori artist and friend decided that she really needed to find a home for her loom. She had acquired it in 1987 but then discovered shibori so no more weaving.  I’ll look forward to getting it working. Yes another loom in my space and another plaque coming up.

DSC01603 (400 x 600)

There has been another 5 day workshop. This time three students came from Vic., NSW and Qld for intensive study of woven shibori.

They wove……

DSC01655 (600 x 400)

8 looms were set up in a variety of structures and yarns so that a wide range of techniques could be explored. Here Jennifer and Lynda weave on an 8 shaft countermarched and 16 shaft computer assist respectively.

This is Marjorie’s loom in action with Virginia (the loom donated by Cathy and Peter). All students enjoyed it.

DSC01653 (600 x 400)

They pulled up to dye…..

DSC01624 (600 x 400)

They worked so hard, showing great commitment. We also had a lot of fun along the way. Morning tea and an examination of results.

DSC01650 (600 x 400)

At the end of 5 days this is what they each managed to produce. What a collection!

DSC01657 (600 x 400)

DSC01660 (600 x 400)

DSC01662 (600 x 400)

The level of commitment shows in what they managed to achieve. I am certainly impressed.

I had the opportunity to visit the local Spinners and Weavers Guild. It was a real treat to spend time with these ladies. It brought back great memories as it was the first guild that I belonged to. There were some familiar faces from a long time ago. What a shame I forgot the camera. http://redlandsspinnersandweavers,wordpress.com

Now for my continuing adventures with my replica Laotian loom experiment… well as of last month it did undergo some modifications but it remains the Great Experiment.

The following is a movie from my recent Laos trip and will give reference to what I’m about to undertake.

How to make a vertical storage system on a Laos loom.

I have graphed out the design from one of the scarves I collected in Laos. Each squares represents 2 warp threads.

DSC01582 (600 x 400)

From this graphed design I have picked up the pattern on the loom. Getting it perfectly centred took a couple of tries. Using cotton ties to identify pattern change and centre certainly helped.

DSC01632 (600 x 400)

I know that I have to get this picked up design to behind the plain weave shafts to transfer it to the vertical storage system. To do this I did it in two stages, Firstly I turned the pick up stick on its side and transferred it to behind the beater, then repeated the process to transfer it to behind the shafts. I confirm that I’ve got all the warp threads (pairs) at each stage.

DSC01633 (600 x 400)

DSC01634 (600 x 400)

Then to transfer it to the storage system. I had tried with my usual wide sword (middle one in the image below) and discovered that it was difficult to do the transfer with ease. I knew that I’d need a super wide one. I recognised that my wood working skills are basic and came up with an alternative by going to my favourite place for perspex (Plastic Welded Supplies at Capalaba). I got them to make me one with smoothed off edges. It works a treat. Here are the pick up stick and 2 swords that I use for the transfers. While the wide one is not necessary for the previous transfer it is absolutely essential for the next stage.

DSC01669 (600 x 400)

This is the process I used: First position the sword immediately behind the plain weave shafts. Then bring all the pattern heddles forward. Turn the sword on its edge and hey presto the heddles not selected slide backward leaving a gap. This wide sword makes the job so much easier. Then I’ve inserted a narrow dowel in the gap and moved it to the top suspending it by putting them in the loop of Texsolv cord. It works a treat. In Laos I saw both yarn and bamboo being used to store the design. (see previous posts) I’ve decided to use the equivalent of the bamboo rods instead of a cord purely because I think it may be easier to manage. I’ll try the other later.

DSC01640 (600 x 400)

DSC01641 (600 x 400)

DSC01643 (600 x 400)

At some stage one does have to weave. This is the process that I’ve worked out is best for me. After removing the picked up design just once without storing it and having to pick up again, one recognises the need to have a system in place!

1.  Pick up the design and transfer it to behind the plain weave shafts. Do not remove any of the pick up sticks. Weave the pattern row by turning the pick up stick on its side. Remove the stick and the sword between the beater and plain weave shafts. Check that the pattern and picked up pairs is correct.

2. Transfer the pattern to the vertical storage system. It’s insurance knowing that it is stored but keep the sword in place.

3. Weave plain weave. It’s necessary to remove all but the wide sword to allow for the plain weave shafts to move.

4. Turn the wide sword on its side and weave the pattern row.

5. Weave plain weave.

The process is slow but I’ve only got a couple more rows of the design to store.

DSC01672 (600 x 400)

Here are some observations: Lightness of equipment and movability are very beneficial.

Having those light weight lengths of wood as treadles allows for the heddles on the shafts to move freely- very necessary in transferring design. The ability of the shafts to move forward and backwards facilitates transfer and weaving as each stage is processed. I have the vertical storage system under flexible tension with it being anchored by stockings tied to a brick. The brick anchors it, while the stockings allows for tension, necessary in the opening of the vertical storage system during the selection process. In the movie, the weaver re-tensions with her feet. I had to find an alternative as my toes don’t work that way. Here’s a general look at the loom to show these systems in place. The bricks are insurance for when it rains.

DSC01664 (400 x 600)

I am looking forward to weaving without pick up. It’ll be soon. Lastly a close up view of the border so far.

DSC01675 (600 x 400)