Last Weave: June 2019

June 3, 2019

Unexpectedly, yet peacefully on Friday 31 May 2019, Kay Faulkner; beloved mother to Helen and Andrew, Sister and Aunt, Friend and Mentor, passed away in hospital after experiencing a catastrophic bleed on her brain. This is a difficult time for her family and friends who will miss her creativity, innovation, humour and care.

To many, Kay is a master weaver: a textile artist and innovator who produced many fine works and exhibitions of unparalleled quality. Kay’s approach to design and problem solving established new techniques and processes; and her critical eye saw beauty and potential in the most mundane, raising them to become extraordinary.

To others, Kay was a mother, wife, sister, daughter, aunt, a dear friend: someone with a zeal for life and travelling the world, dedicated to taking every experience and making the most of its potential. Kay was a mighty and independent woman with an affection for sharing good red wine, cheese, dark chocolate and conversation with special friends. She was someone known for her care and hospitality for others.

Kay pursued her passions with gusto and always invested in opportunities to share knowledge and skills through mentoring and teaching others. Learning, creating and teaching characterise much of Kay’s life and the legacy she leaves with us. To say that Kay will be missed does not begin to fill the hole we feel she has left behind, but we know that we love her and that we were loved by her in the many ways she was known to us.

Thank you for showing us a life well lived Kay.

A Celebration of Kay’s Life will be held on 2pm on Friday, 7 June at the Great Southern Memorial Park in Mount Cotton. All who know Kay are welcome to attend, please dress in bright and many colours, or in something made by Kay. In lieu of flowers, please donate to Australian Cancer Research.

PLEASE BE AWARE!!!
 
We were contacted today by the funeral director and there has been an error in the booking of the venue for Mum’s Celebration of Life Ceremony. It will still be happening on Friday 7 June at 2pm, However the venue for the ceremony is now: 127 Russell Street, Cleveland. There is parking available in the Church paddock across the road.

April 2019: Fibre Arts @ Ballarat and visiting Adelaide

May 1, 2019

The focus for this month’s blog is my class at Fibre Arts, Ballarat. Six enthusiast weavers spent 5 days with me. This week long gathering at Ballarat Grammar School happens every Easter and plays host to a wide variety of classes on all manner of textile related classes. It’s always a treat to catch up with past students, meet new ones and get to spend time with a wonderful group of textile enthusiasts.

Four of my students explored aspects of Summer and Winter. After working through a series of exercises, it was very much up to the individual what aspect they continued to explore and whether they wished to develop a project from this. What was especially encouraging was that each student developed their own designs. Some even developed a portfolio of designs.

This series of images show progress on the looms and the development of projects.

Di’s project.

IMG_4665

A collection of samples and a table mat. There’s more to be done and all based on her design development.

IMG_4680

Trudi’s project.

IMG_4667

A collection of samples and a table runner with bands of different motifs. Trudi took great delight in developing designs on her computer and then weaving them. The only problem was: which one?

IMG_4678

Elizabeth’s project.

IMG_4664

Elizabeth’s sample. I hope to see the number 50 woven as pick up in a celebration cloth later on.

IMG_4686

Jane’s project.

IMG_4671

Jane had flagged before the class that she was interested in ikat. she dyed a series of experimental wefts.

IMG_4662

As well as working on a set of samples, she also experimented with different approaches to using weft ikat either as plain weave or as a supplementary weft.

IMG_4681

IMG_4682

There were also two new weavers in the class. They worked basic twills. I am always delighted to be instrumental in beginning a weaver’s journey. It’s an exciting time for both an individual and for the future of weaving.

Carolyn explores the combination of colour and twills. Each of the four place mats has a different colour theme and style of weaving twills on 4 shafts.

IMG_4668

That’s the one with cool colours. Here’s the rest. She has only part of one to go.

IMG_4675

Bailey, wanted to explore as many twills as possible. As well as weaving, he also recorded  each of them on a weaving program.  He started on a 4 shaft straight threading and then expanded to a twill gamp on 8 shafts. Yes, he put on two warps. That meant he also got to consolidate warp preparation and dressing a loom.

IMG_4666

The second warp goes on with not much supervision from me. He remembered the process well.

IMG_4673

It’s always a treat to share and to celebrate what each group has achieved. This was our offering. That’s an impressive amount of and variety of weaving from the class of 2019. Congratulations go to these enthusiastic and committed weavers.

IMG_4688

IMG_4690

Thanks goes to Glenys and Noni and their “Golden Team” for making this such a wonderful event. Check out the Fibre Arts website for next year’s event and others. http://www.fibrearts.jigsy.com

My friend, Pat turned 90. As well as being a very “old” friend in that I have known her for many years, she was a wonderful weaver.

IMG_4692

I have had the opportunity to visit Adelaide, South Australia for a few days. I caught up with Kate, a weaver mate and had a wonderful few days just talking weaving. I also got to see TARTS in Adelaide. There was some great textiles in here. I was especially pleased to see work from a couple of weavers.

IMG_4698

IMG_4699

The Art Gallery of South Australia had this very interesting exhibition. It is well worth a visit.

IMG_4705

Included in this exhibition were two textiles. Image and details of each item. Firstly this wonderful large scale coat from Uzbekistan. I have long admired these.

IMG_4700 (600 x 450)

IMG_4701

Then this wonderful robe. Check out the detail. The background tiles in this exhibition were also quite stunning.

IMG_4702

The studio class in May is on the family of twills and what can also be woven on a twill threading. Looms are already set up. In addition there will be opportunity for students to develop designs and explore other techniques which will be threaded during class. There are just so many possibilities.


Parallel, the exhibition March 2019

April 5, 2019

Over the past few months, I have made reference to developing work for this exhibition.

IMG_4605

Over 20 years ago woven shibori was launched onto the world stage by Catharine Ellis of North Carolina, USA and Kay Faulkner of Birkdale, Australia.  Their research occurred independently and simultaneously. (RAG publicity)

This exhibition celebrates that significant milestone.

Redland Art Gallery, Cleveland Australia

10th March – 14th April 2019

Before I even write about the exhibition, I would like to acknowledge the support given by the gallery and staff in hosting this exhibition. They did the hanging. They have done a superb job. As you look at images take note of how they are presented. Having the work off the wall shows it to the best advantage and allows those weavers who want to see the back to be able to do so.

The Opening on Friday 8th March was extremely well attended. Janet de Boer OAM did the honours and provided a very engaging experience.

IMG_4558

This photo of Catharine and myself is courtesy of  Redland Art Gallery with the photography by John Muller

Courtesy of Redland Art Gallery. Photography by John Muller. (600 x 499).jpg

Here are views of the gallery from the left and working around the gallery.

IMG_4628

IMG_4630

IMG_4632

IMG_4631

IMG_4633

IMG_4635

Both Catharine and I had a series of work in the City Council’s foyer, just outside the gallery.

IMG_4625

IMG_4626

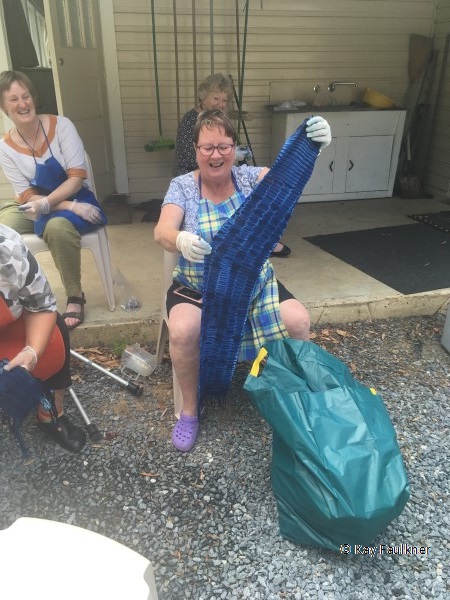
Some of the crowd at the opening.

IMG_4563

I enjoyed the interaction of visitors with the “ladies” from my installation of “Give them voice.” This is images is from the Artist talks held on the following Sunday.

IMG_4621

The following is my artist statement in italics with images of my work interspersed throughout.

The year was 1998. I was heading to Convergence, the biggest conference for hand weavers in the world. Before I left I had been informed that my article on Loom Controlled Shibori had been accepted for the prestigious weaving magazine, Weavers. En route, I was delighted to hear that my work was also to appear on the cover. What an honour! Convergence was also where I’d heard a weaver would be teaching “Woven Shibori Resist”. Can you imagine, this was going to be the meeting of two individuals who had developed this technique independently though at the same time on opposite sides of the world? We met. We discussed our different approaches, we discovered many personal parallels. We became friends.

“From the archives”: the article and table runners, 1998.

IMG_4597

“Landscape” 1997 from my first exhibition featuring woven shibori, hand woven and dyed wool, acid dyes

DSC06294

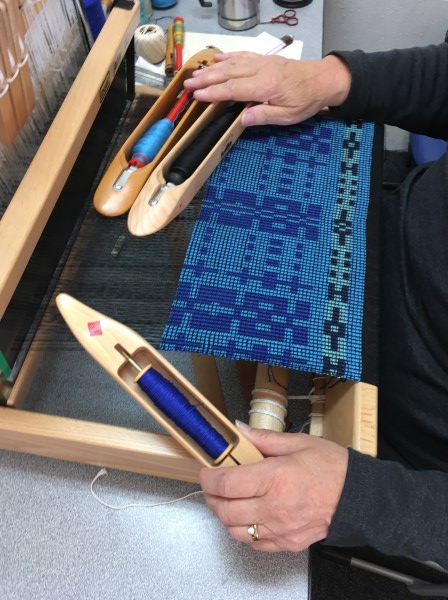
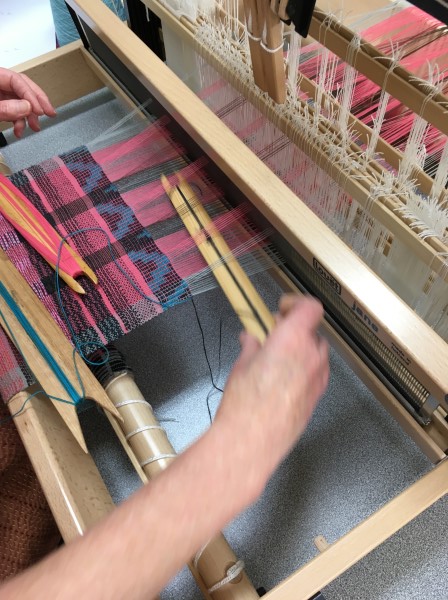
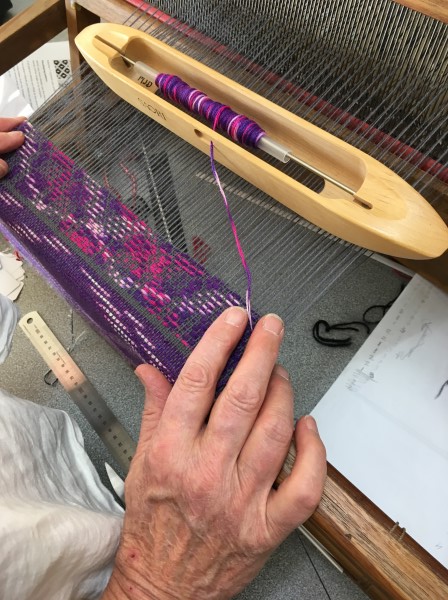
Over twenty years ago when I first started working with the technique of loom controlled shibori which soon morphed into being known as simply woven shibori woven shibori, it was simply a means of adding a dye pattern to cloth. I was fascinated by how many different dye patterns could be achieved. My early work was very heavily influenced by traditional shibori approaches. Then I became interested in using different media in combination with dye or even instead of dye. It was all about adding pattern to a cloth. You wove, you pulled up the threads, added some dye or applied a treatment and then on undoing the resist, a pattern was exposed. The experience of revealing the pattern was addictive. It was the cloth.

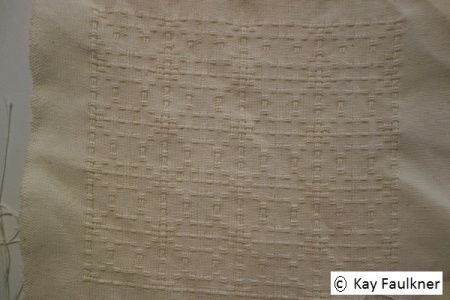
Detail of   “Inspired by tradition” 2010, hand woven lace with woven shibori, silk, acid dyes. Photo Don Hildred.

DSC05899

Detail of “Controlled Simplicity” 2010, hand woven fabric with complimentary woven shibori, silk, acid dyes, three panels hand sewn together.

DSC06503

After a while, I wanted to take more control of the process. While there was still an element of serendipity in the dyeing, I became more fascinated by the relationship between fabric structure and the dye process. No longer was an overall dye pattern important. The starting point was very much structure and its potential from both perspectives. I made the structure work. I was inspired by structure.

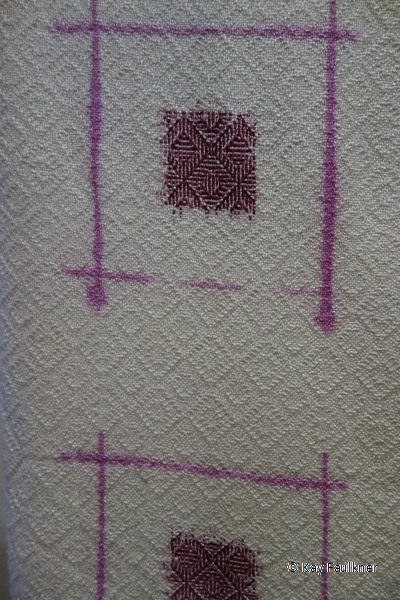
Detail of untitled kimono, 2010, Hand woven silk, shadow weave, double ikat, warp and weft shibori, acid dyes.

DSC06502

Detail of untitled kimono, 2010, Hand woven silk with cotton/linen, twill fabric, weft shibori woven on a draw loom, acid dyes.

_MG_0796 (2)

Over time, the technique of woven shibori became a familiar tool and is now just one of the many that I use in my studio practice. In developing my work, I do not start with dye pattern or with structure but rather from the story that I want to tell.

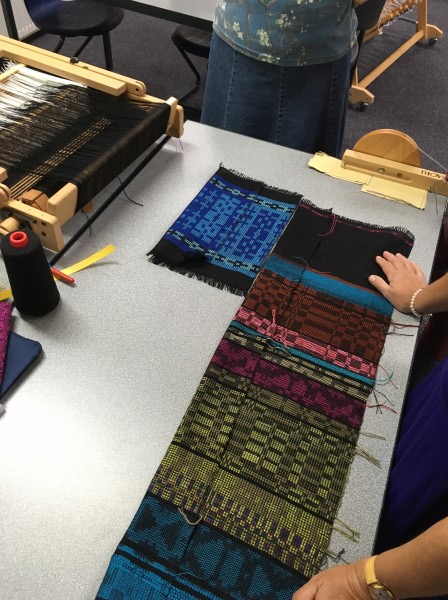
This exhibition has allowed me to present both work from a time span of over twenty years and current work. It has given me an opportunity to reflect on how my use of the technique has changed and of the role it has played of my studio practice.

Current work: Reflecting on where I live.

I am a long time resident of this area. In fact I have lived here for nearly 40 years. It is the place where my husband and I settled to when we got married. It’s where our children were born, raised and left from and have even come home to. It’s where he died. It’s where I live and create. It does in some way give me a sense of belonging.

I have a general awareness of the history of this area of The Redlands. I have long been aware of the historic homes: Ormiston House, Whepstead Manor, The Pines, The Old Court House and the like. There are roads named after early settlers.  Perhaps its history could well provide a starting point for inspiration for a new body of work. And so I began researching. I found out lots about the men who settled here. How much reference was made to females? Not much of course and the further back in time, the less you find. Sometimes even in the family notices, it is difficult to see the real women.

For the purposes of developing one theme for this exhibition, I decided to limit research to the female history before 1900’s. That will allow for a time frame of about 50 years when this area first had white settlement. As an aside, while I certainly acknowledge the first people of this land, I don’t feel qualified to present it and nor is it the focus of this research. I have had a very interesting time visiting the Local History section in the library, going on line for oral history and old newspapers, visiting the Museum, having discussion with people who have stories to tell. Everyone who I’ve had connection with in this project have been extremely helpful. I certainly appreciate their help. I have collected stories and references and found out all manner of interesting things. And sometimes there’s an echo of my family history even though I my family heritage is not from here.

The story cloths presented in the series Give them Voice are of 8 women representative of their time. Their stories are of real women though their names have been withheld so that they can become representatives of their contemporaries. Their figures are partially here as only part of their story can be found. However they were a part in the early history of this city and have left their mark, reflective of the way that the shibori has marked this fabric.

Visitors to the gallery, take time to read their stories. In much the same way that it took me some effort to read they also have to take time to follow the diagonal weaving line so that the stories can be read. They have the opportunity to wander amongst this community of ladies and have a conversation.

Close up detail of “Give them voice”.

DSC06517

Close up detail of one of the 8 panels: “My family sent me”, 2018, hand woven story cloth, cotton, triacetate/acrylic, natural dyes (eucalyptus and my grandmother’s pomegranate).

DSC06497


Please go to this like for more details of “Give them voice” 

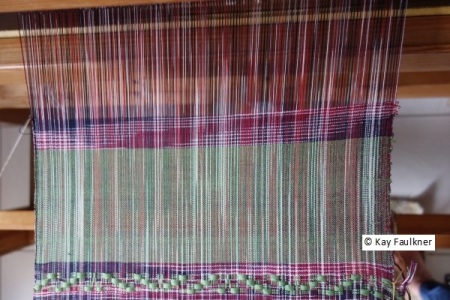
“Family Notices 1866”. 2019, Hand woven, cotton with linen, woven shibori, natural dyes (mud: red dirt from Wellington Point), printed family notice with selected entries from the newspaper: The Queenslander, 3rd March 1866, embroidery.

DSC06277 (2)

The process of making these women “real” required following the stories that would appear and disappear. I followed their trails and I have gained awareness. The series Tracks and trails reflects on the ephemeral nature of their impact on the land, of a moment passing in time and a story that is partly uncovered.

“Tracks and Trails I”, 2019, hand woven, double weave, wool layer and triacetate acrylic layer, woven shibori, acid dyes.

Tracks and Trails I

Tracks and Trails II”, 2019, hand woven, double weave, cotton, linen, woven shibori, natural dyes (pomegranate and iron).

DSC06511

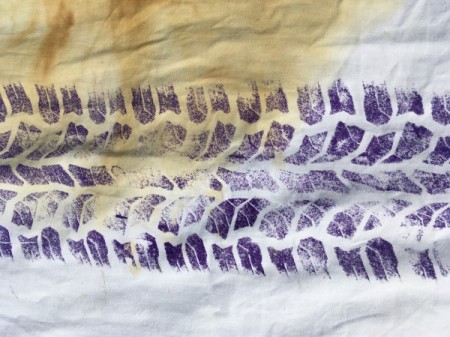
Tracks and Trails III” 2019, hand woven, double weave, cotton, woven shibori, natural dyes (pomegranate and iron), textile paint. Tyre courtesy of Nic McCarthy.

DSC06512

Tracks and Trails IV, 2019, hand woven, double weave, cotton, wool, woven shibori, fibre reactive and acid dyes.

DSC06515

Researching work for Give them voice, also encouraged me to reflect on progress. Progress has brought huge advances in the status of women, medicine, the way that we live and the things that make life easier. However it also brings with it stresses on the land and the environment. It brings more development, more roads, and more people. Often when we look at where progress is taking us we wish that it can be halted.

Progress I, 2019, hand woven, cotton with linen, woven shibori, dyed with eucalyptus (Tallowwood), dyed with rusty bits including iron from Ormiston, fabric paint, credit Andrew Faulkner for access to his tyres.

DSC06506

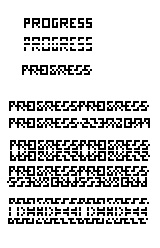
Progress II, 2018, hand woven, cotton, painted warp, triacetate acrylic supplementary weft design based on the word “progress” which has been distorted, woven shibori, fibre reactive dyes.

DSC06507

This new work allows me to reflect on the impermanence of our era’s mark on the land no matter what our gender or race. Will our mark or our story be easily read in the future? Will future generations be able to find research on the people living now? What will they think of these times that we live in?

It is exciting and I am honoured that I have been asked to tour this work to other galleries. Those will be announced later.


February 2019: Parallel, more adventures with vertical storage and woven shibori in Tasmania

February 28, 2019

All is organised for the exhibition next month. Here’s the invitation. Next month of course there’ll be more on the exhibition. It will be well under way by then.

RAG Invites March 2019 Parallel HR

Now to continue on from last month’s blog.  I had started to explore the possibility of weaving with a vertical storage positioned between the beater and the shafts. Previously I had worked with it behind the heddles at the back of the loom. Having it positioned at the rear of the loom allows for free movement of the shafts. Having the storage in front of the loom means that if anything is selected on the pattern shafts, it has to either work with the heddles or it has to be disengaged every time the basic fabric structure is woven.

In the previous month, I explored the use of the stored pattern being used in addition to plain weave to create vertical floats for Bronson Lace. This is an ideal application. What else could I do? As an extra challenge, all the patterns to be woven had to have elements of the same pattern developed for the Bronson Lace.

I have already shown this image of 3 approaches last month. The previous month recorded the process of weaving Bronson Lace. As you’ll see there was more woven on this warp.

DSC06391

It is extremely logical to achieve weft floats for woven shibori. It was also timely weaving some woven shibori as it has been the focus over my studio work leading up to next month’s exhibition. The resist floats can easily be stored in the vertical storage. It is common and especially so in this pattern, that every resist row is different. This suits storing it and allows for a progression of sequences with plain weave being woven on the shafts between.

This undyed woven shibori design shows direct correlation to the Bronson Lace table mat.

DSC06398

I decided to explore other possibilities.

The next challenge was to weave the design as a supplementary weft motif. This is a typical style of weaving for this type of loom in S E Asia. I have modified and extended the original pattern. There are 37 pattern rows. As this is an image with a mirror repeat, I needed to store the design to achieve this. I have discovered that the number of bamboo sticks that can be efficiently used to store a design is limited. This was my opportunity to investigate using loops of thread to store the design. I was very familiar with this from Se Asia but had never had the occasion to apply it.

Loops of thread are passed between the long heddles instead of bamboo or dowel. These loops are suspended on hooks attached to a length of wood. For multiple repeats, there need to be a series of hooks at the top and bottom of the storage unit.

DSC06369

See blog October 2015 (second half of the blog) for a full explanation on how to pick up the motif and store a design.

DSC06372

Here’s a close up of the storage loops. Move each one down (or up) to select the next pattern row.

DSC06377

Looking from the top down, the stored pattern can be easily seen.

DSC06389

Two rows of pattern are woven, separated by a row of plain weave. As I suspected, I needed to deselect the pattern lift between plain weave rows. The lift otherwise would be included in the plain weave. Having the storage unit behind the shafts means that the selection does not alter plain weave. The same pattern row can be left selected for however long you wished to weave the same row. In this case however no selection could be maintained. Rather I left the thread loop in position and reloaded the pattern lift for the repeated row. It was a little inconvenient however the ease of storing the pattern made up for this inconvenience. In spite of the double handling of the pattern loop, weaving the reverse of the pattern happened surprisingly quickly. I took nearly 2 days to pick up the pattern and wove it backwards in less than 3 hours with a cuppa included.

DSC06388

Rather than weaving a long runner with several reversals of the stored pattern, I wondered what else was possible.

I decided to revisit Becker’s Pattern and Loom and repeat the technique I had already explored. (Blog: September 2017 ) I decided to start with a simplified smaller version of the same motif that I’d been using. Rather than paired threads there were 4 or 6 threads lifted together. The design is interpreted so that each square equals 2 threads, necessary for this technique of changing twill direction to work, so 3 squares in this case equals 6 ends. The front and back of this series are labelled below.

I soon decided that I didn’t like the effect. (A)

Next I reworked the design so that there were only single squares to be lifted. This was then woven in the style outlined in Becker. There is that interesting effect of the sides of the diamond being different. (B)

It was in my mind that the weavers of Cambodia  ( Blog:  May 2017) wove diagonal lines using this loom set up and basic principle. I have this lovely ikat cushion with the diamond ground structure. It is woven in plain weave with pattern shafts.

DSC06437 (600 x 400)

I decided that structurally this would be achieved by including either an extra thread being picked up at the reversal points in the stored design or an extra row being woven in the weaving sequence. This would achieve the outside threads in a series of 3 working in the same manner. I now have a clean diagonal line. (C) The same motif is used for B and C.

The final motif in this series works with a stored lift of 2 or 3 pairs lifted together in combination with a single pair. In essence it is an extension of A and C. One extra thread or row is included at the reversal points. Again the lines are clean. (D)

It is important to note that the reversal points in C and D must be on the same line of the treadling sequence.

Here is the record of that series. A is on the right.

combined2

And then I ran out of warp! This is an overview of all the work from that warp.

DSC06426

The really great news is that all that effort I took in preparing the warp so that individual warp threads pass through single long heddles is done, ready for the next experiment.

DSC06433 (600 x 400)

The Handweavers Guild of Tasmania had invited me to run two, two day woven shibori workshops. One was in Launceston. The other was in Hobart.

Both groups produced an exciting array of work. It is quite amazing what was achieved in two days. Weavers wove on rigid heddle looms as well as those with 4 or 8 shafts.

Here are some images.

The Northern Group.

IMG_4496

IMG_4497

IMG_4505

The Southern Group.

IMG_4539

IMG_4540

IMG_4543

Thanks go to the organisers of both workshops and to the weavers who participated so enthusiastically and with such a willingness to learn.

Coming up next month:

The report on the exhibition.

The studio class on Woven Shibori will be from 18-22 March. There are still places available. Right now I’m working at setting up warps for this class. If you would like to attend and work on a specific project, this is also an available option. There are a number of design approaches being set up but as usual there is often something out of left field.

This loom has been set up to weave an 8 shaft fabric on an 8 shaft loom with a 5 shaft warp shibori pattern using a horizontal storage system. This system is typical of SE Asia. It is a very useful technique for any situation where you need just one or more shafts extra to what you’ve got available.

DSC06421

For full details of this class: woven shibori

The featured image at the top of this blog is an image of the hard copy invitation.


January 2019: Studio class, vertical storage and getting ready for the exhibition.

February 3, 2019

parallel title

A reminder: This exhibition celebrates 20 years of woven shibori. I have invited Catharine Ellis to celebrate with me. All weaving is completed for the exhibition. The exhibition lists, artist statements and didactic panels submitted by both Catharine and myself. It’s rather a relief to be at this stage.

Redland Art Gallery has the exhibition listed in its exhibition guide.

RAG Exhibitions Booklet 2019_Kay Faulkner and Catharine Ellis (3)

The studio class as usual for this time of year was Linen and Lace. This time of year is usually perfect for linen. It was, though I suspect, hotter than usual. Unlike other years this group of four weavers all decided that they wanted to work on their own projects. Three had completed the course in previous years and wanted to revisit a structure, the other wanted to pursue a personal challenge. This meant that I did not need to set up a multitude of looms in different structures.

Maggie has the perfect solution for jet lag or so she says. She arrived in Australia from the UK on the day before the class. She treats attending a class in the studio as a gentle way to recover. Her project was to weave a series of napkins in linen and 3 end Huck. Her design was a modification of a studio hand towel. Her ongoing challenge was to weave every one differently. On the last day she wound an extra warp for 4 more napkins to take with her to be threaded with the same draft so that she could continue her challenge. It was well tied up as it will travel with her for her stay here and then get put on her loom when she goes back to the UK.

DSC06334

Kerry is a new student to the studio. She had asked whether she could use her single 16’s linen and weave in Huck. She had woven with this yarn at home and had some difficulty with it. We started by designing her project. The warp went on and we soon saw that there was potential for warp fraying. The solution was to weave with a temple. This posed no problems as she was used to doing this. The other part of the solution was the use of sizing. Kati Meek has a recipe in her book, Warp with a trapeze and dance with your loom. It is amazing. It’s very gluggy.

DSC06363

The sizing was put on with a sponge working in only one direction. The warp was also woven as soon as it was put on with no need to wait till it dried.

DSC06322

Weaving with a temple and the sizing meant that this warp could be woven with no fear. Various treading drafts were developed. This is an image of her project being woven. Unfortunately my image of the full piece isn’t wonderful so I will not be sharing what she achieved. However it is a beautiful fine piece of linen weaving.

DSC06324

Vilasa wanted to explore design, Huck lace and if time permitted Bronson lace. As she spins her own cotton, she put on a cotton warp as she wanted to weave with something that was relevant to her weaving at home. Vilasa spent time on drafting every day. She became expert at designing with only horizontal or vertical floats or both together. She accepted various design challenges. In the five days she wove 6 of her own Bronson Lace designs. This length of weaving is destined to be a panel of a shirt. Here are 3 of her designs.

DSC06336

DSC06341.jpg

DSC06342

Jan had intended weaving a fabric length in turquoise linen. The yarn didn’t get organised so she wove another project that she had planned for later in the year. She had some hand spun wool that she wanted to use for a vest. The vest pattern is based on an existing garment. She had decided that the fabric should not just use hand spun as otherwise it would be too bulky and too heavy for her use. Rather, the hand spun act as an accent yarn as it had wonderful lumps and bumps. To achieve its potential she was going to combine it with silk and a commercial wool.

Jan had acquired some 20/2 silk, natural in colour to be dyed for the warp. Anyone who knows Jan, realises that she loves turquoise, greens and blues. In fact here is her rag rug that she had brought back finished from the woven shibori class in November.

DSC06316

But I digressed. The silk had to be dyed. So that she didn’t end up with dyed silk left over from the warp, she wound the warp, secured it well and then dyed it. She also chose to paint a skein in various colours that would work in with this green and her weft colours. The warp went on smoothly. Jan’s challenge has been to weave the 3 yarns and to work out the best way to maximise the characteristics of the hand spun wool and very pretty multi-coloured silk. The yarns are to be used randomly so that there is no definite stripe repeat. She is still working on this. She probably needs an extra half a day to finish and I will certainly look forward to seeing this off the loom and made into that vest.

DSC06403

I had put on an extra linen warp on a loom to accommodate two requirements of this class, just in case there was an opportunity for it to be woven on. Vilasa had expressed a desire to also explore Bronson Lace and Kerry was wanting to work in singles 16 linen. Kerry enjoyed time weaving on “good” linen. Maggie wove a strip to be used as a book mark while Vilasa of course developed her own design to be woven. Now that she understands the principles of horizontal and vertical floats, this was an easy transfer to another lace structure.

There was left over warp so I got to finish it off. Yes, more hand towels for the studio. Both employ the same block design within a lace weave frame. One has the blocks in lace, the other as a supplementary weft pattern.

DSC06382

During the week, I also took the opportunity to get a loom dressed and ready for some play with a loom and vertical storage. The students were interested to see a frame become a loom. I was asked: Where’s the beater and where are the treadles? The loom to start with was just a frame.

What were my objectives in this project? In all my previous times of using a loom with vertical storage, it had always been positioned at the back of the loom. In Cambodia, I had seen storage, though horizontal behind the beater and in front of the shafts. This link should take you to the appropriate blog. Scroll down to see images of a loom with horizontal storage. There’s also a video of the loom being used.  https://wordpress.com/post/kayfaulkner.wordpress.com/4200

By positioning it here, I would be able to manipulate the sticks or whatever I wanted to store the pattern with more easily. But what would be the repercussions of having it here. I knew from past experience that when the treadles are not heavy or when long eyed heddles are used, movement of the stored pattern was possible to achieve while plain weave was woven. The pattern could be kept engaged and ready to be used. Logically I knew that this would not be possible with the pattern in front of the heddles but could some compromises be achieved?

I was also wanting to see if I could weave Bronson Lace- well it was the week of Linen and Lace! To achieve this I needed the warp threads to be used singly through the storage system. Traditionally in S E Asia there are doubled threads used here. The warp is usually very fine. I’m about to change a lot of things.

I started with just the dummy warp in a vertical storage.

So I began by winding the warp and threading it through a reed. I needed one end per reed dent.  This would allow me to keep each thread in sequence and I could identify a single thread when it came to picking up the design for storage.  I could accommodate a cotton/ linen yarn (approx. 16/2) singly in an 8 dent per cm (20 epi) reed. It was my finest “western” reed.

Then I knotted one cotton/linen warp (natural colour) to 2 ends of dummy warp (blue) to align with those in each long heddle. This will allow each thread to be raised independently. Everything has to be kept in sequence. So far all this could be accomplished off the loom. In this image note that the cotton/linen has been threaded in the reed before being tied onto the dummy warp in the heddles that make up the vertical storage unit (white).

DSC06315

To thread the heddles on the shafts, I put the warp temporarily back to front on the loom. I could not access the back of the loom easily so it had to be back to front- temporarily. The reed and vertical storage were temporarily suspended in the loom frame purely to facilitate threading the heddles on 2 shafts. Here the two shafts are on the far left hand side ready to be threaded. The wooden clamp behind the beater holds the threads securely.

DSC06317

When this is done, I have the warp threaded though heddles on 2 shafts, then  the vertical storage and then the reed with the bulk of the warp behind this.

Now to put the warp on. The total bundle is turned around. The reed is put in a beater. The vertical storage system suspended in its correct position and the shafts suspended. Treadles are attached to the shafts. Normality returns for my weavers with shafts behind the beater though with the storage between. The warp is pulled through and wound onto the back beam. I am ready to weave.

I want to weave Bronson Lace. If you understand the mechanics of the structure and have this loom set up so that I can choose an individual thread, I can manipulate the threads to achieve my goal.

This is a basic draft for a conventional loom. Using this draft it would be possible to pick up a design by selecting from shaft 3 and adding it to shaft one.

bronson lace

Theoretically I can make my 2 shaft loom weave Bronson by storing the equivalent of shaft 3 on the vertical storage loom. In a 6 thread sequence the second and fourth thread will be stored. I will store this selection in the top of the storage unit.

DSC06354

I will be able to use this stored selection to choose pairs of threads for each Bronson Lace unit. This stored selection will go in the bottom part of the storage unit. Here are two rows stored on bamboo lengths. They are stabilised by inserting the ends into some texsolv cord.

DSC06347

Once I’m ready to weave for a repeated design I’ll be able to move my pattern from the bottom to the top and back again depending on the number of repeats.

This is my graphed design.

draft

This sequence shows the selection process. The required threads are moved down from the stored selection. All pairs of threads are raised.

DSC06351

The design is selected according to the graph.

DSC06352

This pattern is transferred from the front of the loom to behind the beater and onto a sword. I have covered how to store a selected pattern for a vertical storage unit in previous blogs but as it has been a while, here is a reminder.

All the heddles from the vertical storage are brought forward.

DSC06354

The sword turned on its side. This achieves different tension for those threads that are either side of the sword.

DSC06355

By manipulating this tension, the threads that have been picked up at the front of the loom can be stored vertically. A bamboo stick  or dowel is inserted into the gap where the second sword now is.

DSC06356

As each pattern is stored, the unit of Bronson Lace is also woven before the next pattern row is picked up. Here the repeat is nearly picked up and woven.

DSC06365

In essence the weaving process for each graphed pattern row requires 6 rows of weaving.  Weave a row of plain weave, then the other plain weave row + pattern, repeat twice. Then weave alternate plain weave rows. The first row of plain weave should include the pattern warps. This is a very similar process to conventional pick up on Bronson Lace but with the facility of storing your design.

For this table runner I elected to do just one repeat. It suited the dimensions that I required. However having the facility to store this long repeat is certainly beneficial.

DSC06393

As an aside, this pattern would require 36 shafts to weave- another benefit of this style of loom. There will be more on weaving on this loom next month. The same pattern will be interpreted into other structures and more.  Here’s a sneak preview.

DSC06391

The next studio class will be in March (18th-22nd) on woven shibori to coincide with the exhibition.


December 2018: More on the work that will appear in the next exhibition.

December 30, 2018

Research has taken me in several directions that somehow have influenced my work. While you don’t get to see finished pieces, I will share research and thought process that I have used.

I have become hooked on visiting Trove, the National Library of Australia web site where I can trawl through old papers. www.trove.nla.gov.au/newspapers. There you can select your choice of state and a whole lot of newspapers come up. Because of the time line that I’ve been researching, I’ve been looking at three: Brisbane Courier (1864- 1933), Moreton Bay Courier (Brisbane 1846 – 1861) and in particular, The Queenslander (1866-1939). It is a fascinating way to pass a lot of time. I can find births, deaths and marriages, a whole lot of classifieds and some interesting articles. I even found one on earth closets (Saturday 10 Feb 1866 pg. 11) I have been caught up in looking at page one and births deaths and marriages.

A look at The Queenslander for 3rd March 1866: page 1, Family notices, provides a typical style of presentation. I don’t always find listings for this area. It’s a bonus when I do.

Please take note of the wording. It can give an insight into the status of women. It also reinforces the perception of the invisibility of women in the mid 1800’s, a theme that I began in the October post.

Births. These are two notices that follow a standard format.

Strachan- on the 26th February, at Cleveland, Mrs JW Strachan of a daughter.

Grenier- On the 26th February, at her residence, Mrs G A Grenier of a daughter.

And then here’s another standard format one that really reflects on the importance of women. It is not unusual that “the wife of Mr………………..” is used. But this one also lists what he does.

Smith- On the 23rd of February, at her residence, Duncan’s Hill, the wife of F. T. Smith, builder of a daughter.

Marriages

Here’s one for my area:

McLeod-Gray On the 24th February at Cleveland by the Rev Lacy H Rumsey, M.A., Edward McLeod, Esq of Cleveland, to Hannah, widow of the late Walter Gray Esq of Ipswich.

Deaths

There were 6 deaths listed: 4 children and 2 women. Again here are 2 typical formats. Sometimes the wife gets listed in the death of a child, while at other times there is no mention of the mother. It is sobering to read of the child’s age in the mid 1800’s.

Bartley- On the 1st March, James Norman, youngest son of James and Mary Ann Bartley, aged 12 months.

Hawkers- On the 1st March at the Military Barracks, Emily, infant daughter of Sergeant Hawkes, 12th Regiment, aged 22 days.

And then one contemplates how life has changed. Thank goodness for improvements in medicine and medical practices. Thank goodness for improvements in the status of women and thank goodness for the things that have made daily life that much easier. Progress indeed!

When I first started spending many hours in the Cleveland Library I came across old maps and references to roads.

Early white explorers often followed aboriginal tracks that later became roads. The current Mt Gravatt- Capalaba Road is one such example.

Before there were roads into this area, supplies had to come in by boat, a very treacherous undertaking. There were many instances of boats being stuck or overturned. At one stage Cleveland was identified as becoming a port. Squatters coming from Warwick area through Cunningham’s Gap were keen for it to be a place to ship wool from, until there were one too many mishaps. An early explorer, Alan Cunningham had an 1829 sketch that showed a “road”.

IMG_4306 - Copy


This 1861 map shows both “Old” and “New” Cleveland Road and identifies the “road” as being “a line of trees marked on either side of the Road- being one chain long”. Both roads are still in existence. Over time roads were improved. Bridges built over creeks that needed to be forded especially in times of flood. Drays, mail coaches pulled by horse and bullocks were replaced by early cars. Early settlers required roads.

This drawing of early roads came from a publication “The Cleveland Roads to 1900” and shows how Cleveland was connected to Brisbane.

IMG_4315 - Copy

The roads of course brought more settlers to the area. Progress came.

Of recent time there has been much discussion in the news about development in this area and the need to allow for growth of more people and the ensuing impact on the environment.

And again one reflects on what we call “progress”.

What can I use to symbolise progress? What can I use to symbolise “development” and to identify the mark that both early development and those who came after have left on the land?  There seems to be a link between progress, roads and thereby tyre tracks. Tyre tracks are also impermanent: they can be washed away or covered up by whatever comes next.

Then the fun began! For inspiration, I collected images of tyre tracks and played with printing tyres. Sometimes one just has to play to incubate ideas.

Bike tracks on the beach with a delicate pattern made by a small crab.

IMG_4434

Car tracks in dried up mud.

IMG_4445

A print from a car tyre. My son just shook his head over what his mum sometimes gets up to. It was his tyre.

IMG_4438

This led me to thoughts of developing profile drafts using the word “progress” and to use this to replicate a tyre print format. This is some developmental work.


progress 2b

This is detail of the woven profile using two tie unit weave or Summer and Winter. It’s such a great structure for weaving imagery. How this sits in the whole piece will be unveiled later. At this stage it’s very difficult to identify the word, progress. I guess you sometimes just can’t go back in time.

DSC06023

Lastly, another bit of experimentation. This again links in with where I live and it is in a very physical way. The Redlands is named that for a very good reason. It has red dirt. Originally all this area was productive farming. What was once prize agricultural land is now covered in housing. Now there are just a few isolated farms in the middle of suburbia.

DSC06286

I have been experimenting with mud dye. It might be interesting to add this to my story. Here it is applied to a sample of woven shibori and then undone. Fresh soy milk was used as a binder.

DSC06263

Isn’t it a glorious red brown? Base fabric is a cotton warp and linen weft.

DSC06266

Eventually all these separate threads do come together. All will be revealed in March.

parallel title        An exhibition celebrating 20 years of woven shibori with Catharine Ellis. 10th March- 14 April 2019, Redland Art Gallery.

Classes begin in the New Year. In just a couple of weeks there will be Linen and Lace. Check out the rest of year’s classes here.


November 2018: Studio classes including woven shibori and continuing behind the scenes for my next exhibition

December 2, 2018

This month’s studio class was Woven Shibori.  Barbara, Ronda and Judy worked on class projects in a variety of fibres, structures, effects, warp and weft shibori, in fact a whole range of techniques that could be fitted into 5 days. Jan worked on her own project. She had attended last year’s class and wanted to extend that work.

Here are some images from the class. It was a very successful week. Sometimes students chose to weave a project from a warp. On others they chose to explore a variety of approaches and completed a sampler. The choice was theirs. As a result they went home with a collection of samples and projects and let’s not forget a whole collection of weave drafts.

Weaving: A variety of looms used including the draw loom.

DSC05957


Pulling up.

DSC05958


Dyeing: watching the magic of indigo.

DSC05960


Undoing:

DSC05961


The results:

Indigo.

DSC05962


DSC05986

permanent pleating (not the bottom scarf).

DSC05963


the acid dye bath


DSC05964

DSC05997

Jan had to leave mid-week. Luckily she had finished the weaving of her rag rug but will return at a later date to finish the shibori process.

DSC05976

One of the things that was considered in Colour in weaving, the October class, was the repeat that happens when yarn is commercially space dyed. We often pick up cones of yarns that look interesting and then wonder what we are going to do with them. The length of the repeat on this cone of space dyed yarn just happened to nearly match the width of a left over warp. So here was an opportunity to weave a space dyed yarn as weft ikat. As this was a shibori class I also wove it with a resist.

DSC05947

DSC05941

Once the resist was pulled up, the fabric wanted to curl due to the resist being unbalanced in float length. So I worked with this, wrapped it around a rope and bound it before dyeing.

DSC05951

Of course it ended up in the indigo which of course it was always going to overwhelmed it. I must admit I do like this fabric much better than the original because that red, white, black ikat is so subdued.

DSC05970

DSC05972

Upcoming studio classes for 2019. All classes are limited to a maximum of 5 unless otherwise identified. Details under Kay’s weaving school.

21-25 January 2019          Linen and Lace.

18-22 March       Woven Shibori

13- 17 May          From a twill threading

10- 14 June         Special- own choice.

9 – 13 September            Colour in Weaving

21-25 October                   Weave a floor rug (class size limited to 3)

18-22 November              Double weave and friends

9-13 December                 Special- own choice.

BYO Loom one day a month class will continue next year.

Marja has been coming for the past 3 BYO loom classes. She had never woven crackle, so here was the opportunity to explore. As well as weaving a project a month, she has also come to understand the structure and how it is drafted.

IMG_4370

parallel title

The ongoing saga that was begun last month for the exhibition celebrating 20 years of woven shibori with Catharine Ellis.

At the start of the month: Hot off the loom. I look at this pile and I am overwhelmed- not by the quantity of weaving that has worked out really well but by the amount of resist soon to be pulled up. And then I wonder in over 20 years how much resist would have been pulled up. This exhibition is a cause for celebration! Onward….

DSC05937


Weeks later. The fabric lengths were finally all pulled up and ready for the dye baths. I decided that I wanted to get a range of colours to signify age. The colour had to come from sources that identified age to me.

I used pomegranate that I have had in my garden for probably well over 20 years. The original seed for this ornamental (unfortunately it can’t be eaten) came from my Grandmother’s property (50 years + ago) and then to my mother’s garden. I think that there is a lovely parallel there with my matrilineal line.

DSC06010 (600 x 400)

The other dye source came from the old Tallowwood, Eucalyptus microcorys that grows beside my fence. It has been here a very long time. It was a very mature tree when we moved in 40 years ago so would have to be well over 100 years old possibly older than 200.

DSC06009 (600 x 400)

Tallowwood were a predominant tree of this area before settlement. There is this wonderful example at a local nature reserve.

IMG_4362

This tree is protected and is over 400 years. It was never felled because it had been deformed by lightning when it was about 100 years old but it certainly gives a feel for what this landscape may have been like. I can just imagine the early settlers struggling through the scrub with these and other large trees dominating.

From these two sources, I required 8 different colours. These were obtained by the use of mordants (tannin + alum), the two dyes and a dash of iron. Pomegranate doesn’t technically required a tannin pre-mordant but I did add to help shift the colour for two dye baths. The tannin pre-mordants were tannic acid obtained from oak galls and myrobalan. Because pomegranate is so high in tannin, I also used it as a mordant for one of the Tallowwood baths. Usually I would add a dash of iron to make the colour muddier. In one case it was liquid from a collection of rusty bits that I found and that had been soaking for at least 2 years. While the mordanting was very measured according to weight of fibre, the dyestuff, proportion of them and the quantity of iron certainly weren’t. Here’s an overview of the dye combinations for the 8 colours. As you can see I aimed to cover different combinations of the basic elements.

  1. Pomegranate, no tannin, iron
  2. Pomegranate, tannic acid, iron
  3. Pomegranate, myrobalan, iron
  4. Pomegranate, tannic acid, iron
  5. Tallowwood, pomegranate, tannic acid, iron
  6. Tallowwood, myrobalan
  7. Tallowwood tannic acid
  8. Tallowwood, tannic acid, soaked iron liquid.


The tallowwood leaves were collected whether fresh or old, covered with water and soaked for a day before being boiled, strained and reused. I did not retrieve these for the next bath.

DSC06003 (600 x 400)

DSC06006 (600 x 400)

To prepare the pomegranate bath, I collected both old husks and fruit- whatever I could find, covered it with water and left for a day or so. Before dyeing, the mixture was boiled and then strained. The fruit was returned to the bucket and soaked again till the next day of dyeing. The dye process took well over a week. It is interesting to note that the recycled pomegranate continued to give equally strong dye on each progressive dyeing and that there was still plenty of dye to be extracted by the time I was finished with it. I must admit the odour was pretty strong though luckily hasn’t stayed in the fabric.

Here’s the end result showing the variation in colours though you will have to wait to see what the finished pieces look like till the exhibition.

DSC05985


October 2018: Colour in Weaving studio class and an exhibition announcement

November 4, 2018

The studio class this month was Colour in Weaving. It provided an opportunity to explore all manner of colour related activities and an in depth look at colour theory. There was a total of 8 warps provided exploring different aspects.  I’ll share a couple of their experiments because it was good fun and the results of their labours.

From straight theory they each wound a section of warp choosing a particular colour scheme. These were later combined.

DSC05839

Then the challenge was to choose a colour that would unify.

DSC05841

There was an opportunity to dye so we dyed warps and skeins randomly and for ikat which they took home to experiment with. I will look forward to seeing what is done with those. There was both ikat and painted warps in the workshop. They looked at how to combine several elements together without getting into a tangle. And an opportunity to experiment with a fan reed. Look for this effect in their collections.

This cone of variegated yarn provided one of the challenges. We analysed the colour repeat. They experimented.

DSC05932 (600 x 400)

DSC05848

I loved overhearing the discussion involved in what colour choices were being made. It was no longer “I’m using this colour because I like it” as is so often the case when weavers are choosing weft colour. There was discussion of colour schemes, types of contrasts, values, hues and so on. The decisions being made were very much informed and quite often independently being considered and that was apart from the specific colour challenges I set.

Batch 1 of Sharon’s collection.

DSC05846

and the second part.

DSC05851

Some of Jan’s work. She could only attend two days. She also wove a colour and weave effect tea towel.

DSC05856

Rochelle’s collection. She also worked on an extra warp for a couple of alpaca scarves.

DSC05861

Karen’s collection

DSC05859

Sometimes I get to finish off the warps.

IMG_4278

It was an extremely busy and productive week and of course a great week of very special camaraderie.

The BYO Loom class met with Marja bringing along her first project in crackle. She loves the structure. I love the end result.

IMG_4293

I have a couple of announcements to make.

Firstly I have been working on next year’s program prompted in no small way by two weavers wanting to book in to the Linen and Lace class.

Next month:    Woven shibori. It is full.

10-14 December 2018. Special. Own choice of project or technique. Weave on any loom including 8 or 16 shafts, draw loom or SE Asian style loom. Experiment with a fan reed.

21-25 January 2019          Linen and Lace.

18-22 March       Woven Shibori

13- 17 May          From a twill threading

10- 14 June         Special.

The rest will be listed shortly.

A major highlight of next year will be my joint exhibition with Catharine Ellis to celebrate over 20 years of woven shibori.  You may be aware that both Catharine and I independently yet at the same time developed the technique that became woven shibori. In 1998 she taught it at Convergence for the first time while I coincidentally had the first article published in Weavers. I thought that it was a significant enough milestone to celebrate so I invited Catharine to be a part of a joint exhibition.

Here’s some advance notice.

parallel title

Redland Art Gallery, Cleveland, Queensland. Sunday 10 March – Sunday 14 April 2019. The contract finally came through this month so now it is official.

Now that of course means that I am now officially busy creating. Thank goodness some of the work is retrospective and it is a two person exhibition!  Mind you I have been quietly working away, considering, planning and procrastinating in some cases, since last year when I first proposed the exhibition. While I won’t share the final pieces, I thought that it might be interesting to share some process. This is a glimpse of the start of one of the ideas that I’ve been following.

I am a long time resident of this area. In fact I have lived here for nearly 40 years. It is the place where my husband and I settled when we got married. It’s where our children were born, raised and left from and have even come home to. It’s where he died. It’s where I live and create. It does in some way give me a sense of belonging.

I have a general awareness of the history of this area of The Redlands. I have long been aware of the historic homes: Ormiston House, Whepstead Manor, The Pines, The Old Court House and the like. There are roads named after early settlers.  Perhaps its history could well provide a starting point for inspiration for a new body of work. And so I began researching. I found out lots about blokes who settled here. How much reference was made to females? Not much of course and the further back in time, the less you find. Why not limit research to history before 1900’s and even further to female history within that time frame? That will allow for a time frame of about 50 years when this area first had white settlement. As an aside, while I certainly acknowledge the first people of this land, I just don’t feel qualified to present it. I have had a very interesting time visiting the Local History section in the library, going on line for oral history, visiting the Museum, having discussion with people who have stories to tell. Everyone who I’ve had connection with in this project have been extremely helpful. I certainly appreciate their help. I have collected stories and references and found out all manner of interesting things. And sometimes there’s an echo of my family history even though I my family is not from here.

I hear the voice of my mother who praised 1961. That was the year that the contraceptive pill became available in Queensland. I have of course found references to women and family sizes. That was always going to be easy but here are two that are remarkable. I have intentionally removed names for now.

One bloke had been married twice before he left England (The first wife died after 5 children and the second after 10.) I wonder what happened to those children as he then emigrated to Australia and became the first squatter in the area, 1850 before acquiring a lease five years later. And of course he married: Louise in 1856 and had 7 children raised in this area.

The second story involves a husband, wife and a couple of children who took up a selection here. (You had to work 5 years and make improvements of a certain value before it was yours). She raised 14 children of her own (with the “midwife knowing the track to her house”) and 5 of a neighbour’s. I gather their mother had died.

While family size is often commented on, I have ferreted out other tales. Some are direct references to women while others can be inferred. There are fascinating tales of how the women got here. Apart from coming with their husbands, some came out independently and in the case of one was employed for the trip as a nanny and then abandoned here in spite of being promised a return trip.

I’m amazed at tales of intrepid settlers. I can’t imagine how a woman must have coped with a young family newly arrived in Australia deposited in a clearing and a simple slab hut, isolated with no neighbours close by, tracks that are merely blazed trails and children who have to be kept safe and raised and all those new sounds, strange animals, dangers. Yet they survived, their families grew and each successive generation built on the success of their toils.

And occasionally there are funny quirky tales of life. One involves corsets being worn to work, taken off and hidden and then put back on to go home so that if they met a young gentleman they would be “nice and shapely”.

And so I’ve collected stories, facts and figures and now have to develop a body of work. The research has been fun and an excuse to delve into our history. In fact it’s been rather addictive and I’ve gone down so many side tracks. I think that I had better stop the hard core research and get to making. To celebrate I visit Ormiston House for Devonshire Tea.

IMG_4346

I spent a lovely afternoon with Jessica, their historian. This house and garden is credited to Captain Louis Hope, the father of the sugar cane industry in Queensland amongst other significant positions. We know lots about him. He built this house over a period of time 1858- 1865. There is a wife in the background.  In 1859 he married Susan Frances Sophia Dumaresque.  They had 8 children. However there is some recorded history  made about her and thank you Jessica for providing these and more references: ‘Mrs Hope is just as nice [as Captain Hope], so very good natured and lady like’ (Harry Alington Creaghe in a letter home) and by Mrs Evelyn Alford, who used to visit Ormiston House as a child ‘we often saw her sitting in her favourite position – sitting beside the big windows doing her fancy sewing or entertaining friends’. They eventually sold the property and returned to England.

I should mention that Ormiston House is open to the public on Sunday afternoons.

There was an unexpected bonus from today’s excursion: it’s a real treasure! I have collected some dye material that I’m sure will find its way to being used. This collection of rusted metal is from the large sugar pan that was used by Mr Hope when he ran his sugar mill. It is one of two of the original artifacts from the sugar mill. By the way, the caretaker gave these to me. I didn’t just take.

IMG_4349

What imagery, process, structure or form will I use? And there so many more red herrings, not even related to this research which can distract.  It is major decision time. I need to weave.


September 2018: The tale of two dye projects- but mainly dyeing with lichen.

September 30, 2018


Given a choice between the two which would you choose? Both are dyed with lichen. I heard that there was a chance that I could dye the “purple”. My Canadian friends had a dye bath and I was visiting post Convergence in July. Of course you can dye they said. And of course I was going to. The tan skein had been dyed last year.

This is the story of my Canadian souvenir.

At Convergence, I acquired 2 skeins of silk from John Marshall. I now had something to play with.

There were two dye baths. Both used a lichen called by its common name “rock tripe” or Umbilicaria Vellea. This lichen is brown/black and has curling edges. It is slow growing as many lichens often are and grows on rocks. This was collected in Ontario.

This is the process that two friends carried out and that I took advantage of.

The lichen was dried scrunched and pulverised. It was then put in an airtight jar and covered with one part ammonia and 2 parts water and left to ferment. There were two jars of liquid prepared by two people with slightly different approaches.

The first was left to ferment in a dark cupboard and stirred 3 times a day for 4 months before it was used for the first time when it gave a dark purple.

The second jar was not in a dark cupboard and was stirred vigorously daily. Its initial result was a lighter shade of purple.

However I arrived when the dye bath was now six months old. We wondered if it was still viable. My wonderful friend Bev elected to dye my two skeins in the two dye baths while I went off to do something else.

I decided to keep one skein as a solid colour while the second was tied for ikat. That was an interesting process as I didn’t have any of my usual ikat tape so I resorted to strips of plastic which of course stretched and were pretty useless. After wrapping loosely (up to stretch point), I closely wrapped some thread to create the resist. The thread was actually loom waste from another friend.

I had carefully tied it so that each end mirror imaged itself. It was carefully measured as I wanted it identical. I knew that the end project was going to be half the width of the skein so they had to match.

Here’s the basic procedure as described by Bev. Thank you Bev for granting permission to use your images and of course for allowing me to share your process.

Both skeins were soaked in warm water overnight.

The skeins were put in the two dye baths. Here’s one.

The next day the skeins stirred, squeezed and rolled in towel, then air dried.

The unbound skein ended up in the “dark cupboard bath”. It turned out a beautiful shade of purple.

The other skein was thought to be too light so the process was repeated by putting it I the “dark” dye bath.

Now something interesting happened. Bev was not sure whether this has happened previously but she noticed that when it was removed from the dye bath it morphed from tan to purple when exposed to air!

Later she tried it again: I kept thinking that the skein was not taking the dye, as it looked tan with purple blotches when I pulled it out of the dye bath. Walked outside with the skein in my hands and witnessed colour transformation. This time she got to record it. This series of images shows the progress of the colour change. This will be worthwhile testing with a new dye bath.


I came home with my two skeins. This is the bound skein with the binding partly removed.


But what to do with them? When it came to unwinding both skeins, I realised how fine they were and decided to take a safe option and put on a warp of 60/2 silk that I had in a similar colour.

This balled yarn shows no correlation to the original skein. When weaving care will need to be taken to keep the colour spacing continuous.


The width of the project was determined by approximately ¼ of the circumference of the skein.

I was very happy with the pattern. The width related closely enough to the skein dimensions that the resist/dye areas shifted slightly each row of weaving. It has created an interesting progression of pattern I think. One was woven in plain weave.


And a close up view of how the ikat shifts and progresses.


I then had enough for a second scarf, woven in a combination of simple twills. Here are both scarves finished. The weft for solid colour used in the bottom border is form the other dye bath.


On another dyeing experiment: Another friend gave me two skeins with the direction that they could be woven together. So here they are. This project also fits very nicely into theory for the next studio class.


And the finished scarf. Weaving with a warp faced twill has resulted in both sides having a different colour effect.


In passing I will mention a series currently on ABC TV (Australian Broadcasting Commission). Joanna Lumley is following the Silk Road. It may be worthwhile watching. The first episode opened with a look at velvet weaving in Venice. Maybe there’ll be more textiles. https://iview.abc.net.au/show/joanna-lumleys-silk-road-adventure.

Coming up:

This week coming is the Weaving with colour class. They’ve got some great challenges coming up.

12-16th November: Woven shibori with only 1 place left.

10-14th December is The Special where students can weave anything, explore any technique and weave on any of the looms.

Last Monday was the first BYO loom class. There were four attendees, all working on different projects. I look forward to seeing their efforts in a month’s time. These classes are held on the 4th Monday of the month till and including November.

21-25th January 2019: Linen and Lace.


August 2018: The Bradshaw rock art and weaving in the studio

September 8, 2018

A trip away and then a week of studio class has resulted in a very late blog.

In the main, I only report on textile related matters and of course weaving on my blog. So you will not be seeing images from The Kimberley in N W Australia. It is extremely remote and has featured on my wish list for many years. It would not even rate a mention here apart from an unexpected and amazing encounter with ancient Aboriginal rock art.

We were headed up that dotted road heading north on the map to Mitchell Plateau and Ngauwudu Safari Camp. The road is not for the faint hearted (understatement). A turn off brought us to a significant Aboriginal rock art location. There are no fences or glass panels around this art but once you are here, it is extremely accessible. That in itself was great for us for viewing but with a significant concern for the preservation of the art. My later research pointed out that: In a detailed study of 66 Bradshaw panels, approximately 9% of the Bradshaw images have clearly been vandalized. Some were scratched with stones, some damaged by thrown stones, and some have been broken by hammering with large rocks.* There’s a fine of $2,000 and 12 months imprisonment for interfering with cultural heritage sites. Another cause of destruction is back burning. Since 2009 as part of the government’s fire prevention strategy to aid the exploitation of oil and gas reserves has caused paint to peel from over 5,000 of the 8,742 known examples of Bradshaw art. A survey by archaeologist Lee Scott-Virtue has determined that up to 30 per cent of the rock art had been completely destroyed by fire.* In the light of these facts I consider myself very fortunate to have seen these.

We were in Wunambel Gaambera Country. There were several styles of art here but of particular interest for me were what westerners known as the “Bradshaw rock art” after the pastoralist who discovered them in 1891. As the Kimberley is home to various Aboriginal language groups, the rock art is referred to and known by many different Aboriginal names, the most common of which are Gwion Gwion or Giro Giro

The Gwion Gwion are at the bottom of this image. The rock art at the top is from a later time.

It is common to have later paintings drawn over the top of Gwion Gwion. These later paintings are often not as permanent with the ochres wearing off. We only saw Gwion Gwion with only two colours though it is thought that many more were originally used. The pigments in these two colours have been chemically bonded with the rock. Research suggests that it is the result of symbiotic relationship between black fungi and red bacteria.*

This example shows the style known as the Tassel Figures and identified by their characteristic tassels hanging from their arms and waists, various other accessories can be recognised, such as arm bands, conical headdresses and boomerangs. This style is the earliest, most detailed and largest. It has been dated as up to 22,000 years old from a fossilised wasp nest.

These are finely executed drawings. The lines are fine. It is possible that a feather was used in their execution; an imprint of a feather found at one site may support this possibility*. There is no evidence of several tries being attempted in their execution. They would require an extraordinary amount of skill.

Wayne, our guide, pointed out that these are not the oldest rock art paintings (earlier crude drawings are up to 40,000 years old) but they are the oldest that represent ceremony and therefore well- established culture. This can be deduced from the postures of the figures. By the way, the well- known cave paintings of Lascaux,  France are thought to be 20,000 years old and are of animals.

So why am I so excited by this art? Here’s my observation: If, as Wayne suggests that Gwion Gwion is the earliest known rock art (world- wide?) where the human form is shown performing ritual, then doesn’t it also follow that these are the earliest rock art paintings that include textiles as part of ceremony. Well, tassels of some form are a textile aren’t they?

Additional information on the Bradshaw Rock Art and selected quotes* https://en.wikipedia.org/wiki/Bradshaw_rock_paintings

Update: I have had a private email and whether I got any sense of a fringe/skirt and the formation of the tassels and whether it was too hard to see. Here are my comments as it was such a great question.

I gained the impression from both my research following and from what Wayne said that these are not “skirts” in the traditional sense and the figures are likely to be men. Women are drawn differently. I understand that these fringed ornaments/aka “skirts” are for ceremony and perhaps not daily use. I couldn’t see any detail but I presume they would be of twisted grass/bark or some fibre with an object on the end. You can gain a sense of what some of the objects were from the paintings. Remember some of the original pigments didn’t last so not all detail is here. These are 20,000+ years old and have been exposed to the elements somewhat so we’re lucky to be seeing anything. It’s mind blowing (a) what they are and the detail, (b) the subject matter and (c) that they are still around. Amazing, truly amazing!

Then reality returns. I have just completed a studio class in Doubleweave. There were three wonderful students: Jan, Barbara and Karen, who accepted the challenge of drafting, theory and completed some great work. A wide variety of techniques were explored. Even small samples have the potential to be turned into drink coasters. The following are images from the class.

Four versions from the one threading. The students developed the pattern on the loom.

Different aspects appealed to each student. While some projects are similar, others are quite different.

Karen’s collection.


Barbara’s collection.

Jan’s collection.

Jan and Barbara model their scarves.

Sometimes in a studio class, a student will come with an idea to explore. Karen brought one such project. She wanted to weave a dishcloth…. Yes a dish cloth! She wondered if her Vavbo Lin dish cloth from Sweden could be interpreted into double weave.  It is marketed as a very hygienic way to wash up with the natural qualities of linen meaning that they can be laundered over and over again, becoming softer and more supple with age. And when they eventually wear out, they can be compostable. She has acquired several but as a weaver thought it would be nice if she could weave her own version.

It caught our imagination. This is our version of a dish cloth. It has some elements of the original.

Karen weaving her dish cloth.

It is woven in linen.

We intend it to be compostable. We will avoid all micro fibre dish cloths in our kitchens in future.

It has an open weave body as the result of a stitched double weave structure. The stitching happens on the diagonal.

The selvedges and hem are in plain weave to give stability to the open structure of the main cloth.

We intend it to be compostable. We will not be adding to land fill or pollution.

It will be easily washed and quick to dry because of the linen and the open structure.

We know that it will be serviceable. Even though the structure is open the stitching provides a well- integrated cloth. Nothing will get caught between layers.

We intend it to be compostable. It is a plant fibre and will break down.

It has texture- ideal as a dish cloth. It is also flexible and will become increasingly so with wear and washing.

The double weave layers will enhance the absorbency of the linen.

And it will go into the compost after its lifetime of being useful!

I think I’m hooked on these. They’ll be a great addition in my kitchen.

Update: Charlene has requested details of the draft. I believe that this is such a great thing for the environment that I am happy to share. If you share it please acknowledge the fact that it is my draft. Here is the basic draft. Shafts 7&8 are for the selvedge. Repeat the rest of the draft as required for your width, sett and yarn. Weave plain weave for the hems.

Next month’s studio class: Colour in Weaving. We’ll be exploring colour theory, colour and weave effects including log cabin and shadow weave amongst other structures. There’ll also be the opportunity to explore dyeing techniques such as painted warps or skeins, ikat and how to use these. And perhaps we’ll even get to use the newly acquired fan reed. There is currently 2 places left. 1-5 October.

The BYO loom series starts on the 24th September. It will be held on the 4th Monday of the month finishing in November.